Announcement

Collapse
No announcement yet.

GIGABYTE GA-P67A-UD7 Vs. P55 Review Featuring 6Gb/s RAID/USB3 Testing

Collapse
X
 
  • Filter
  • Time
  • Show
Clear All
new posts

  • GIGABYTE GA-P67A-UD7 Vs. P55 Review Featuring 6Gb/s RAID/USB3 Testing

    GIGABYTE GA-P67A-UD7 Review Featuring 6Gb/s RAID/USB3 Testing


    Gigabyte springs into the world of Black PCB motherboards with the introduction of their latest offering in the P67 series, the GA-P67A-UD7 motherboard. This leaves only the mid-range and lower end boards using blue PCB. This motherboard utilizes the latest technology, offering massive expansion capabilities on-board. Standing out in the crowd due to the very unique black and gold color scheme, the GA-P67A-UD7 is sure to deliver.

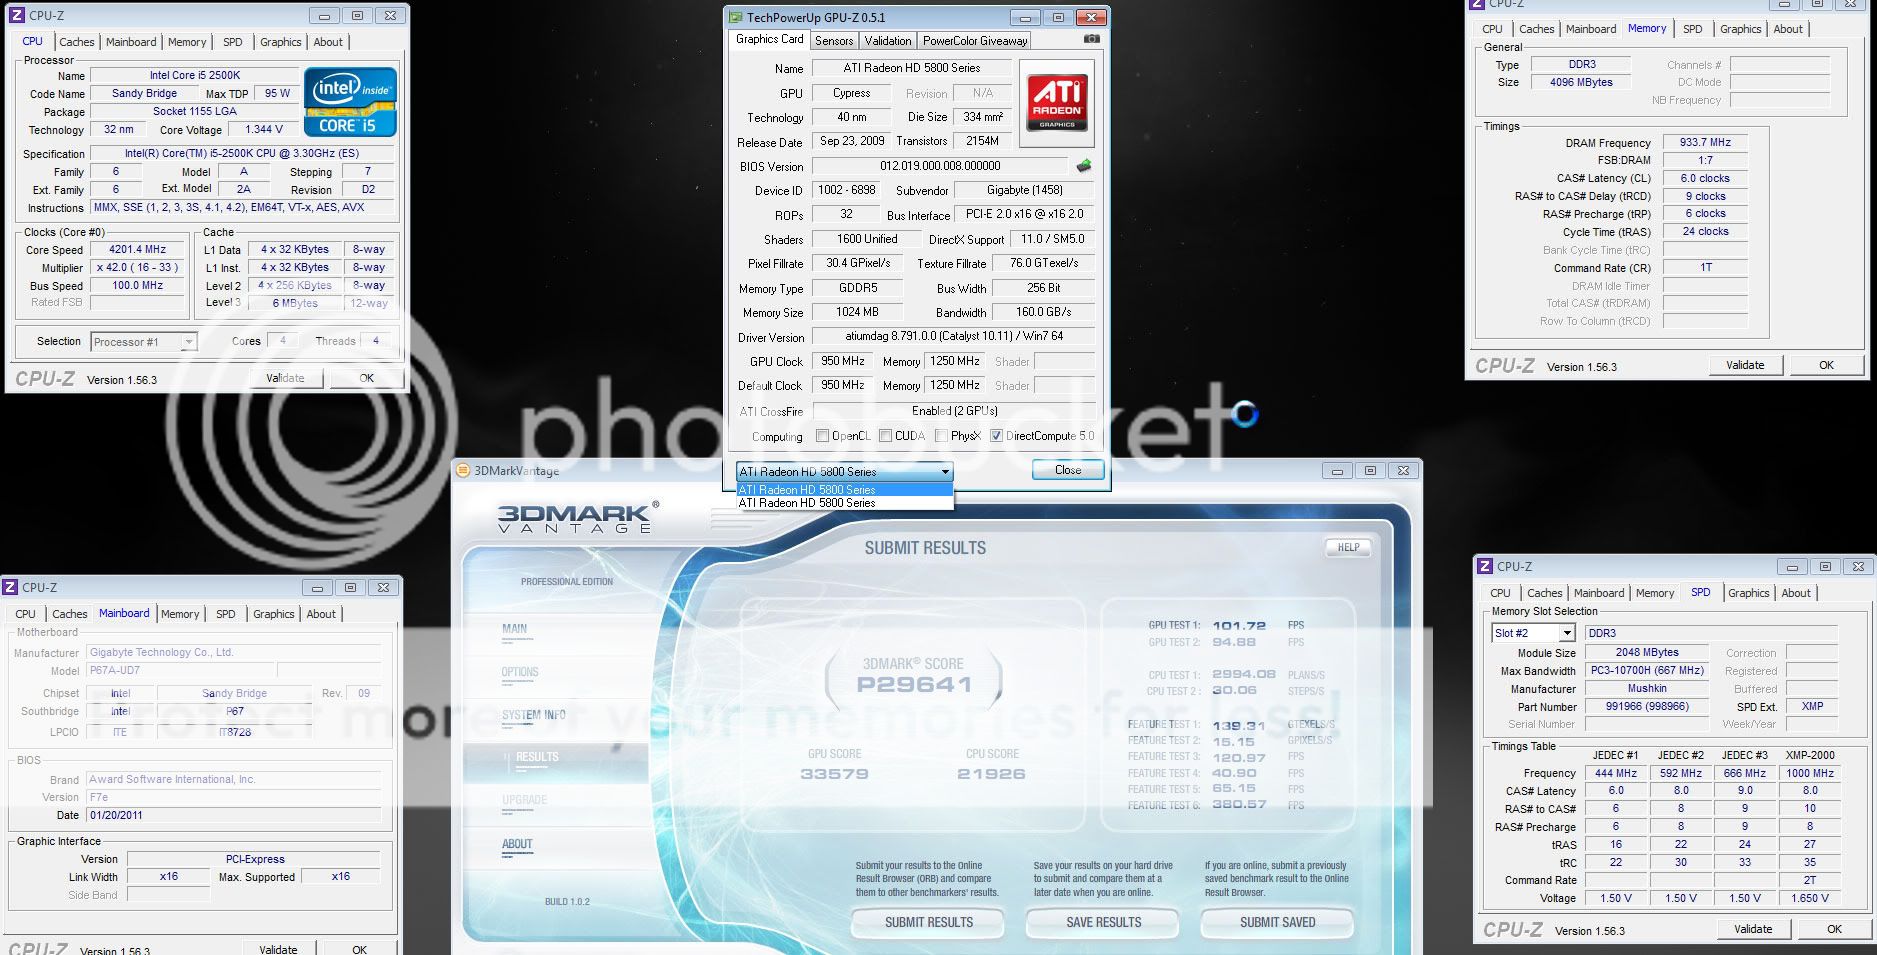
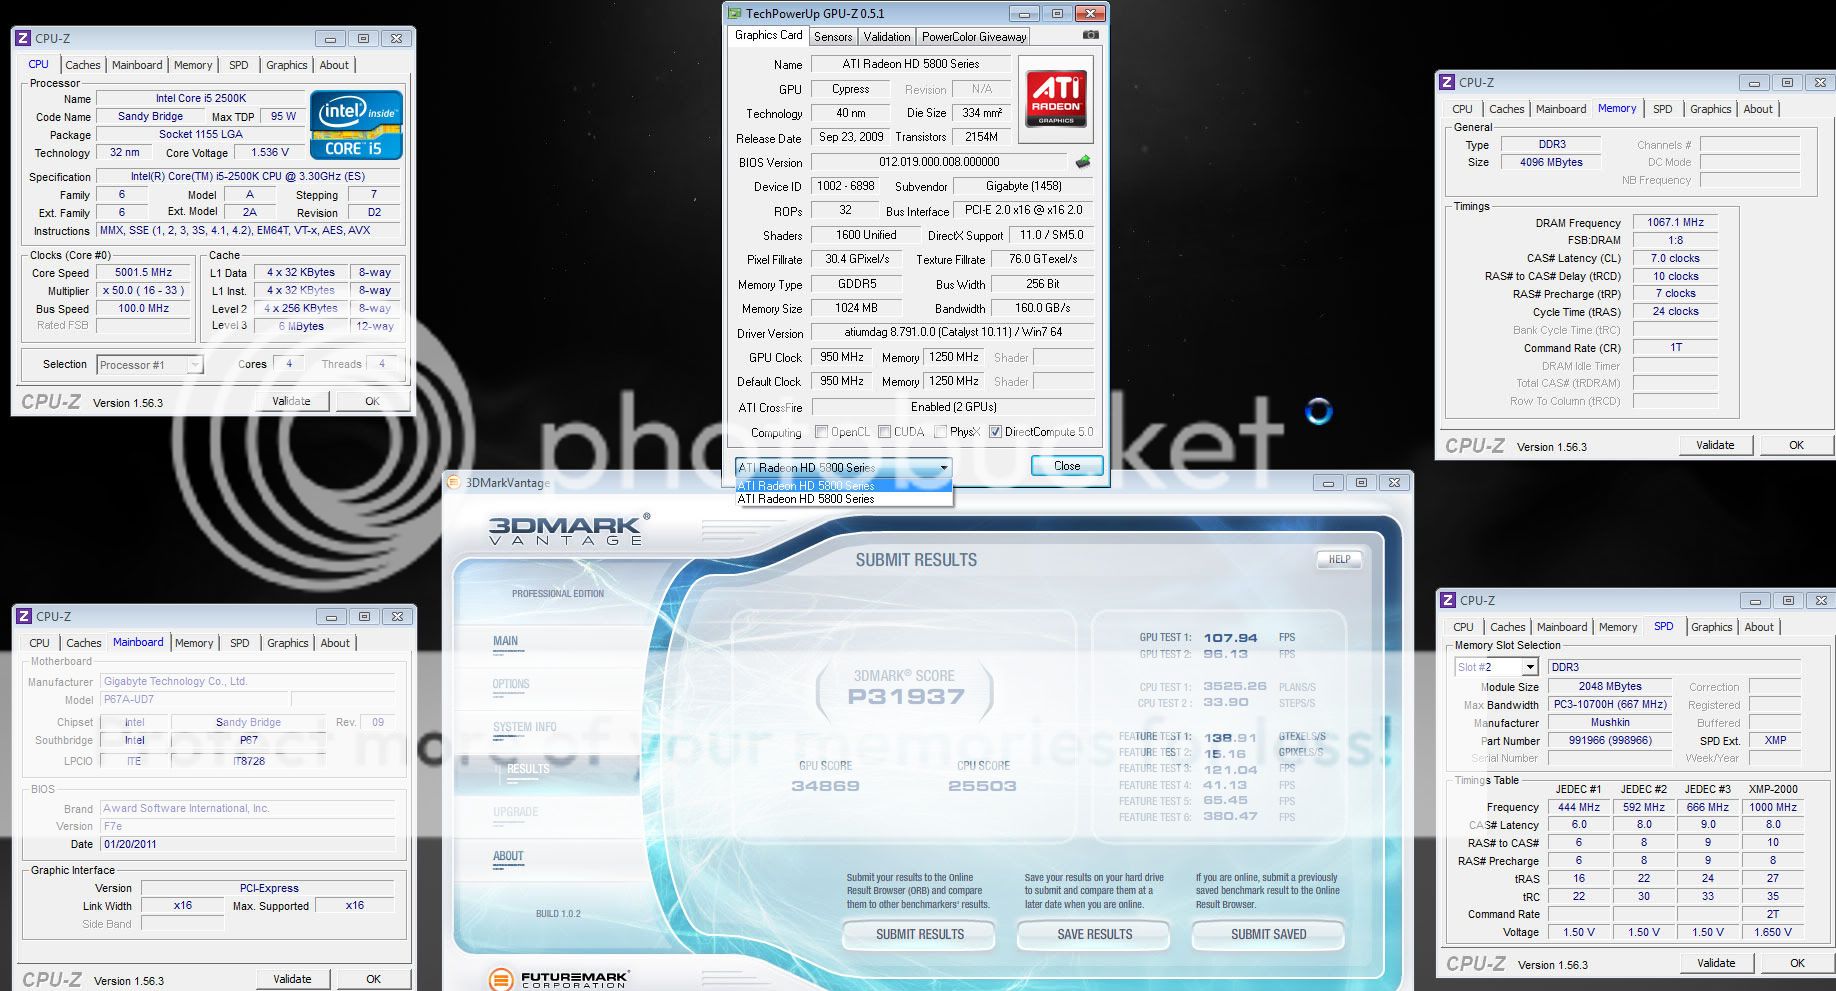
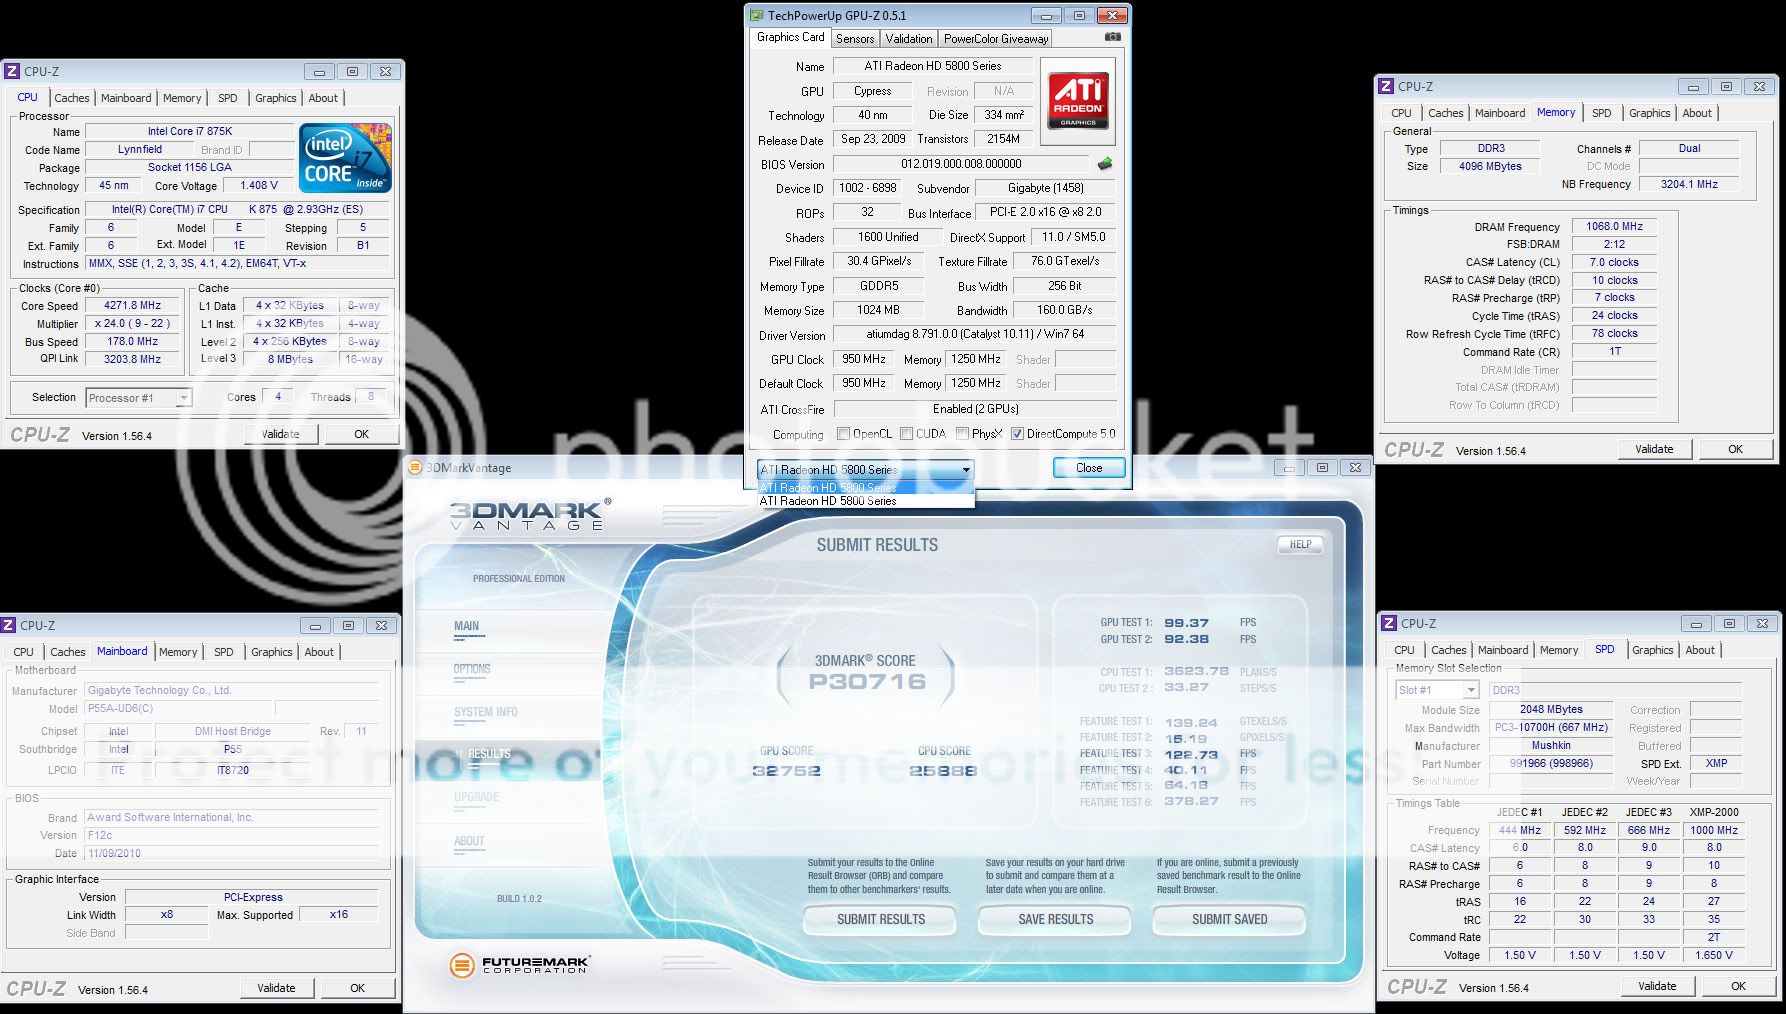
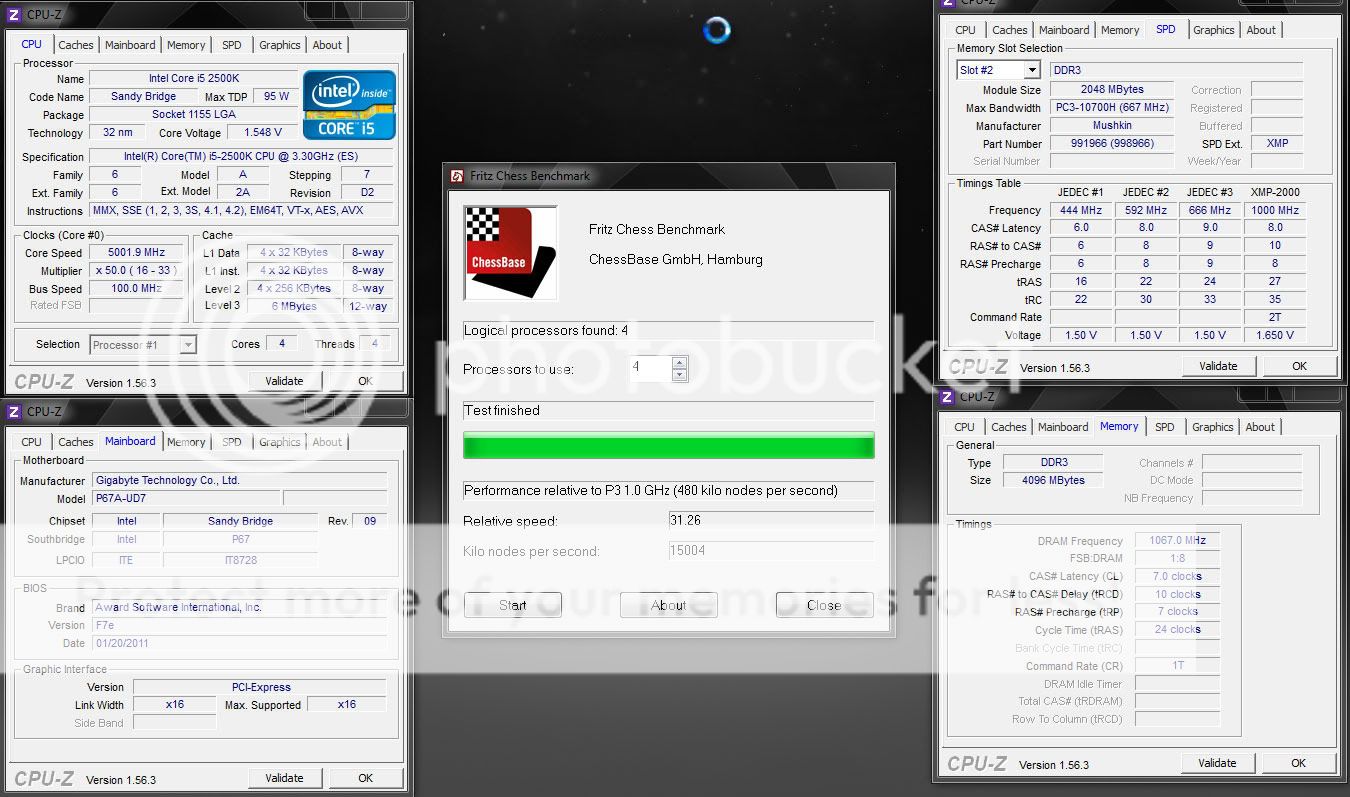
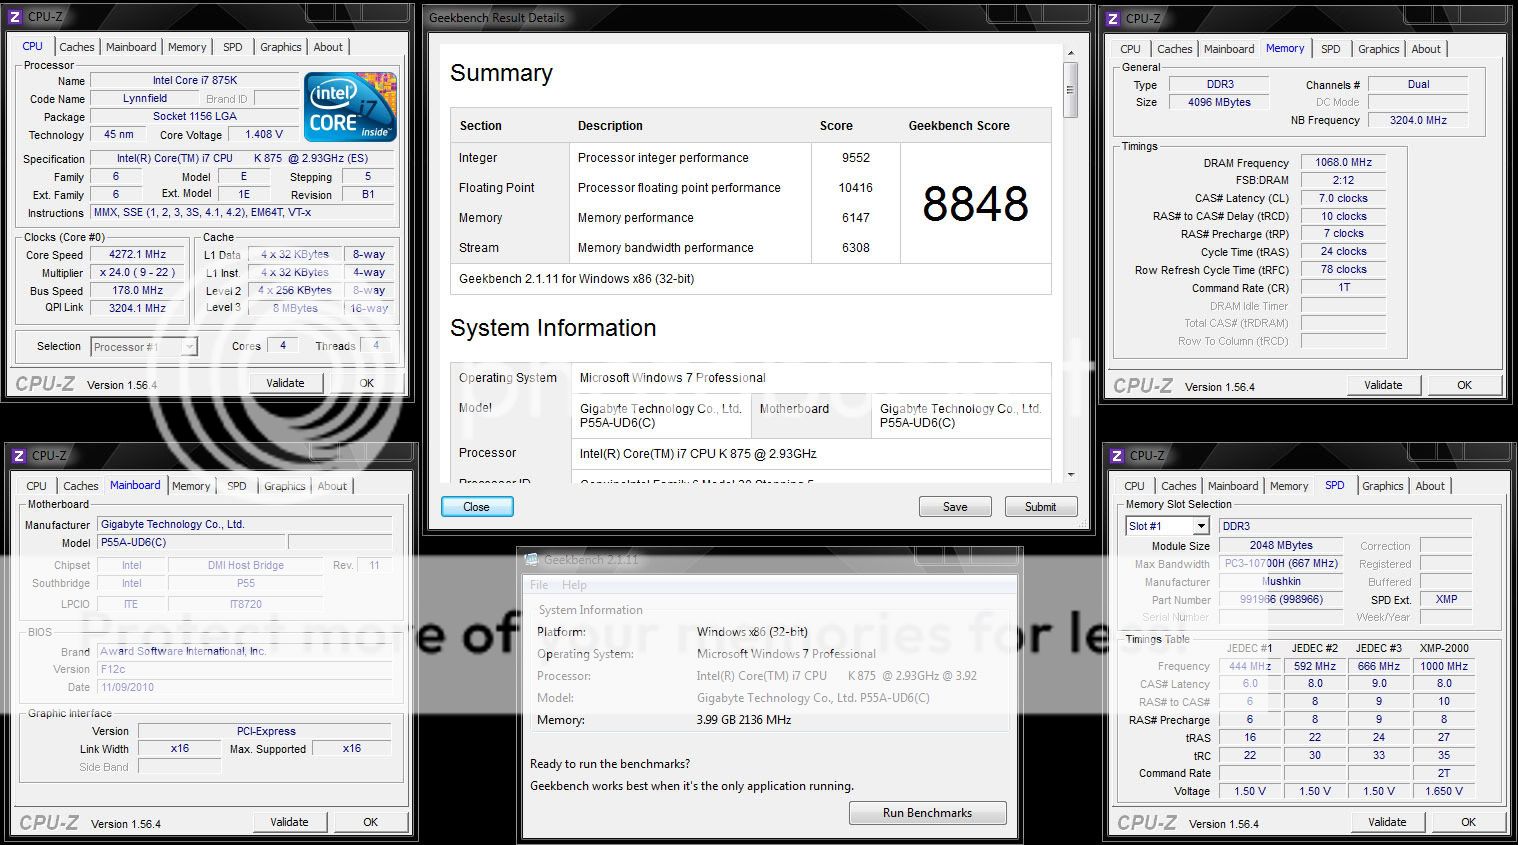
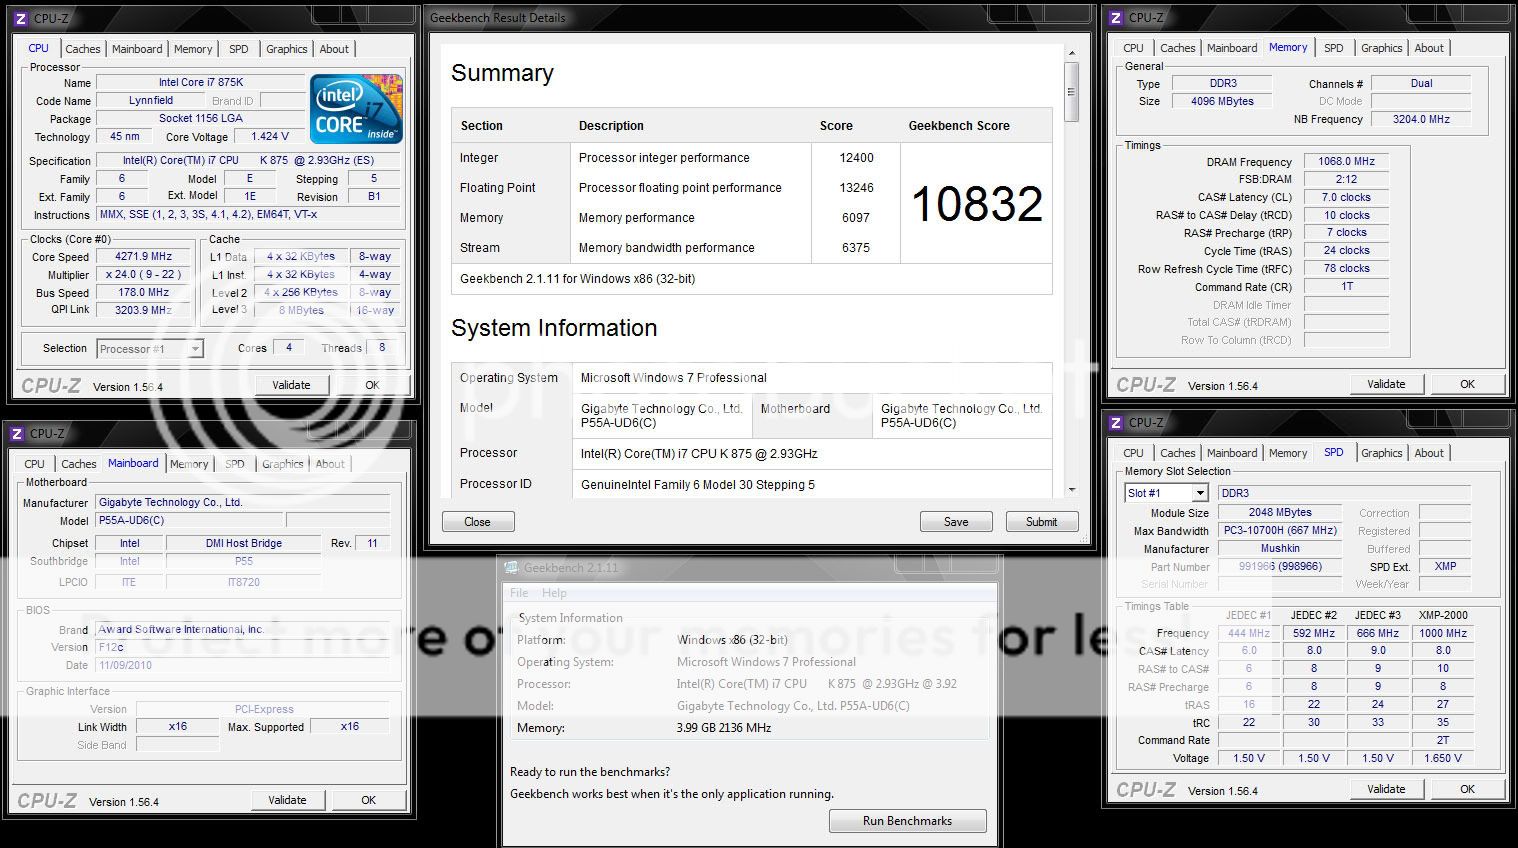
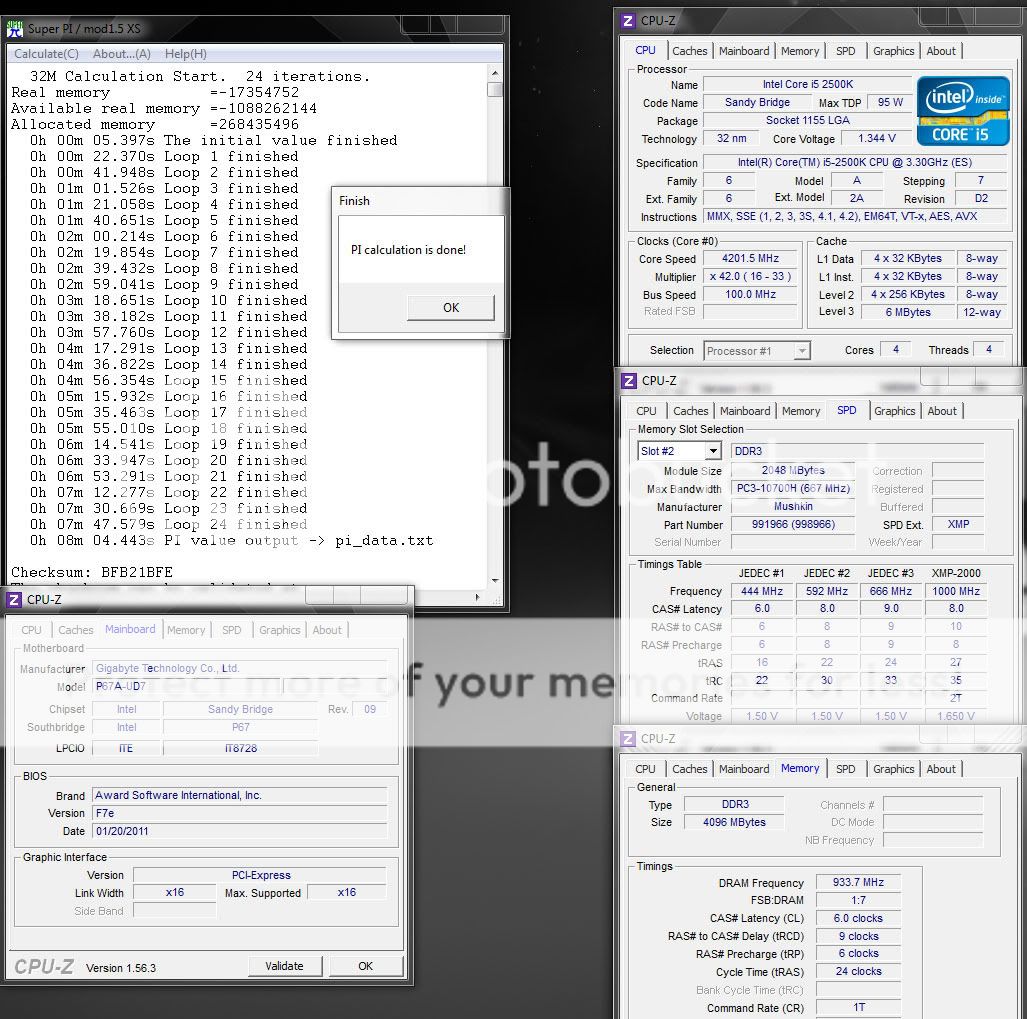
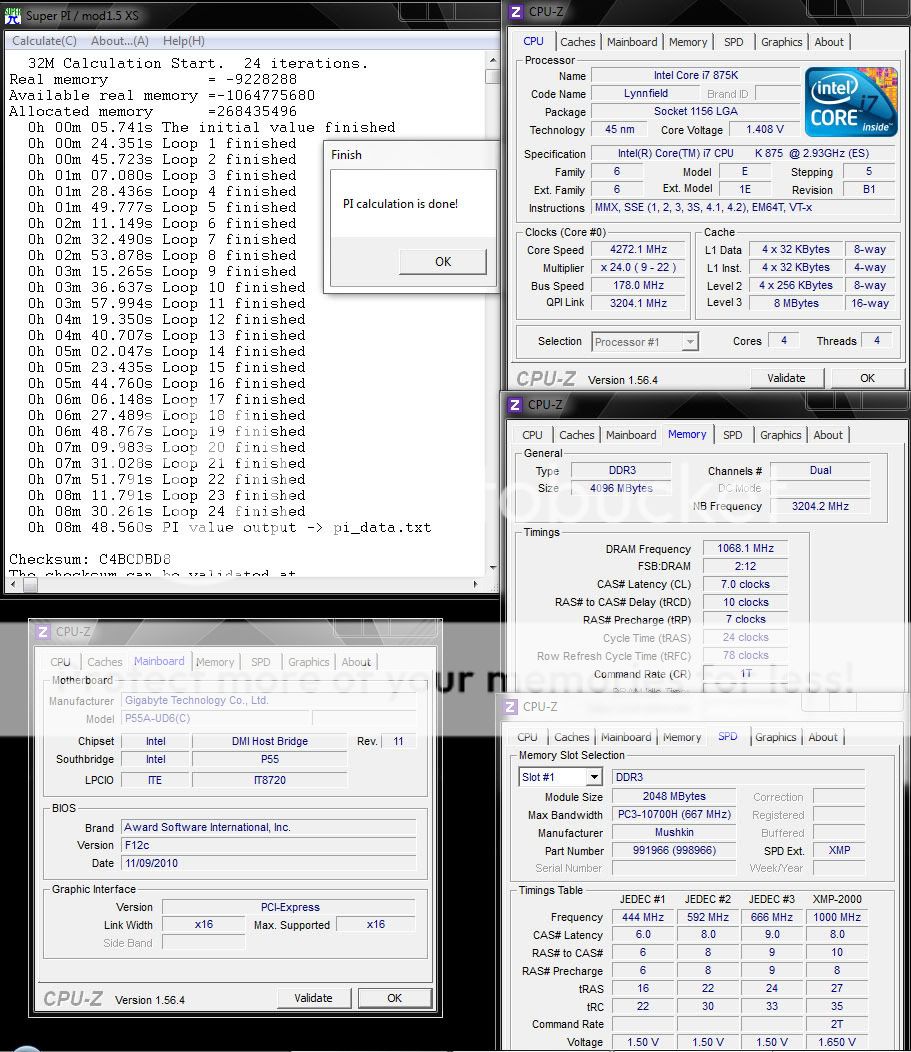
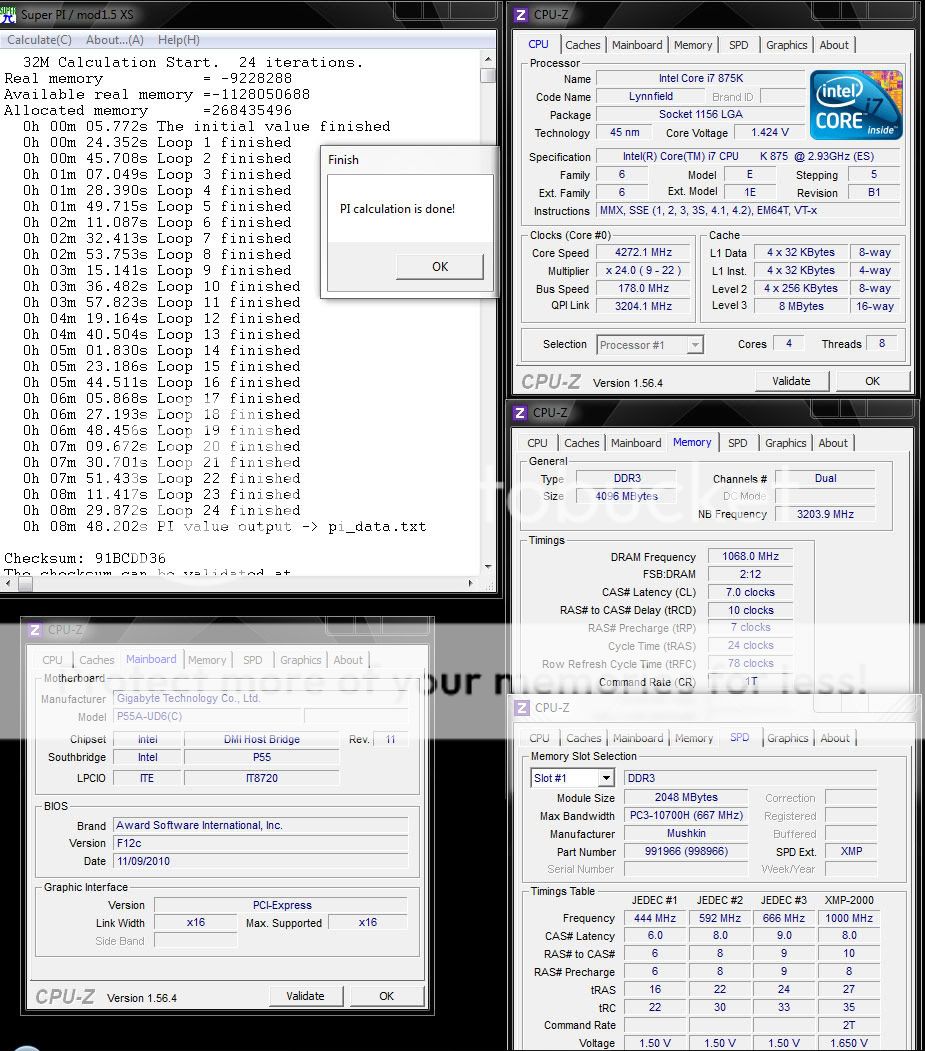
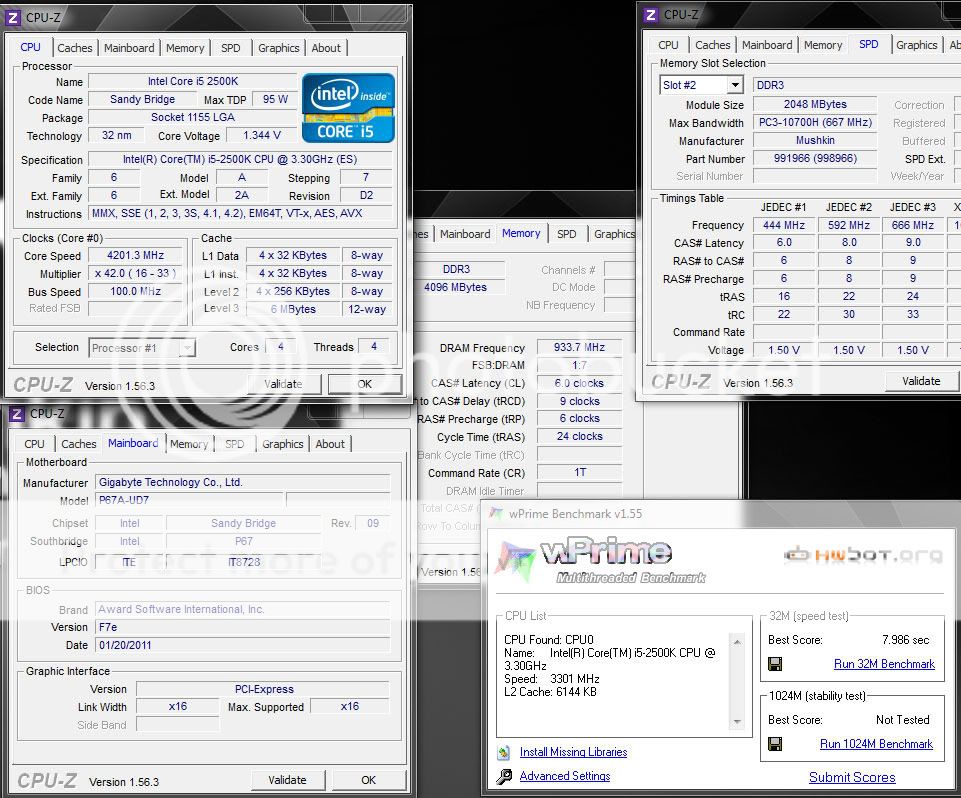
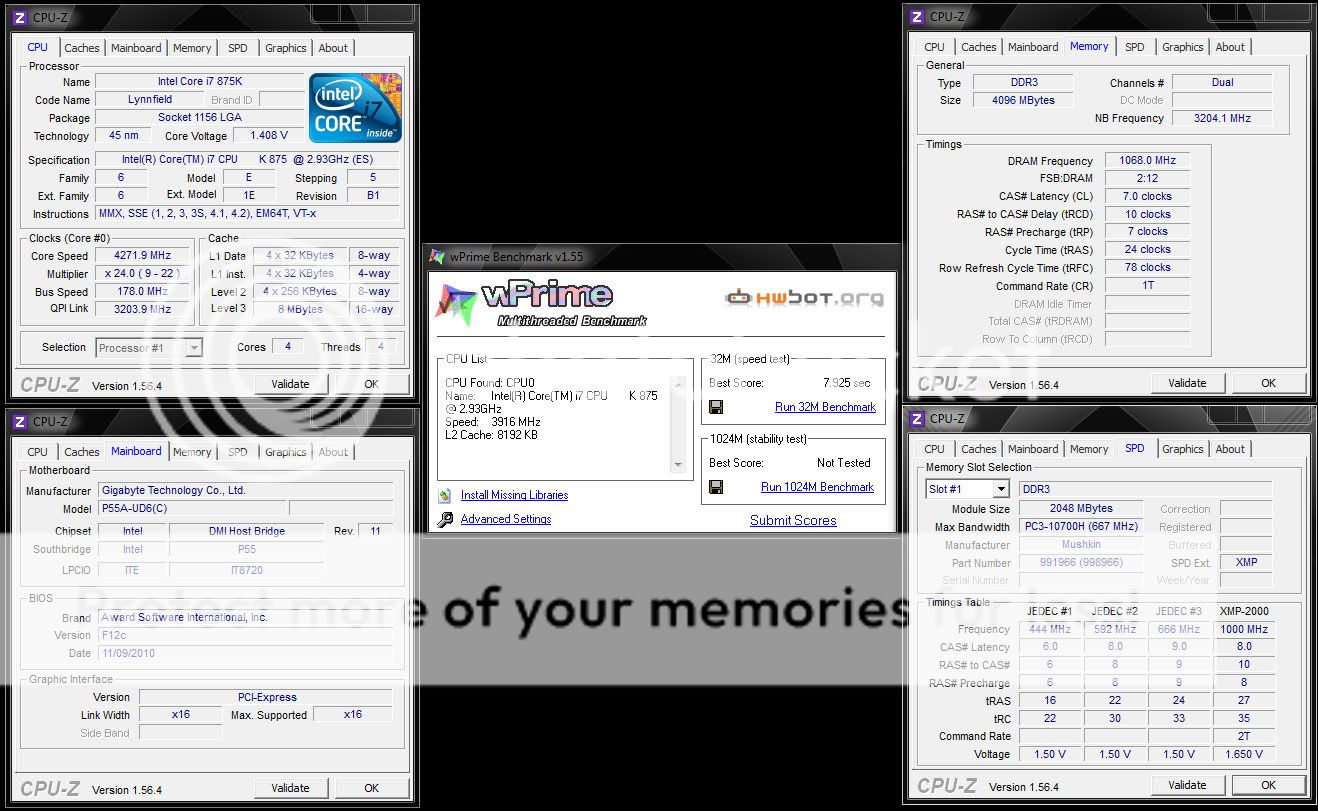
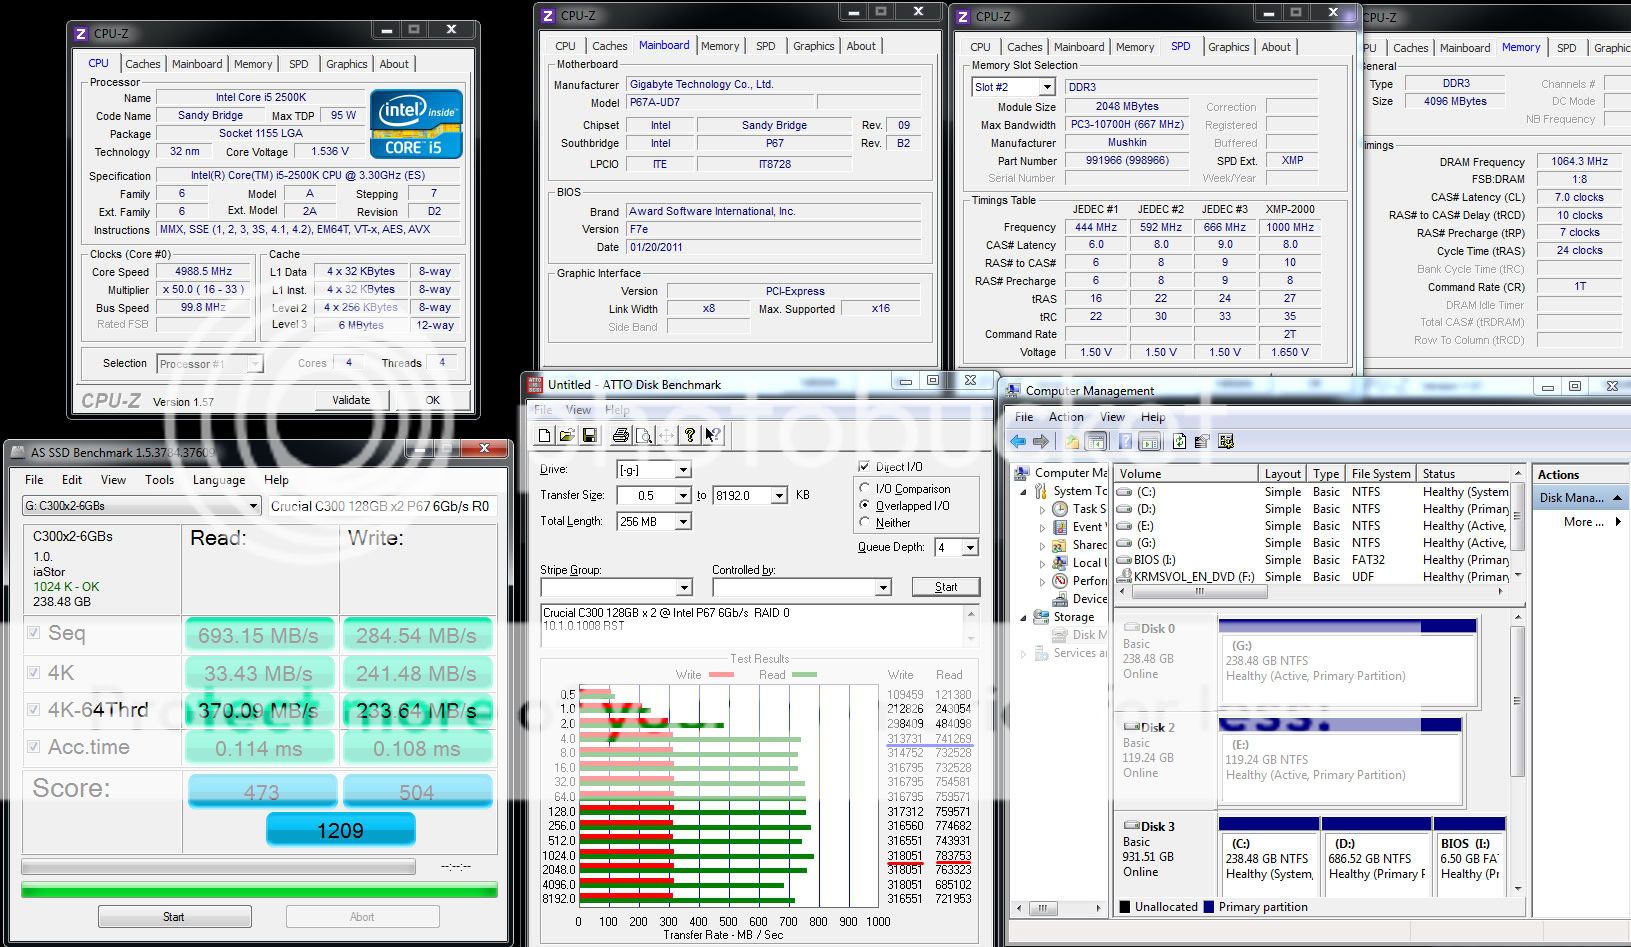
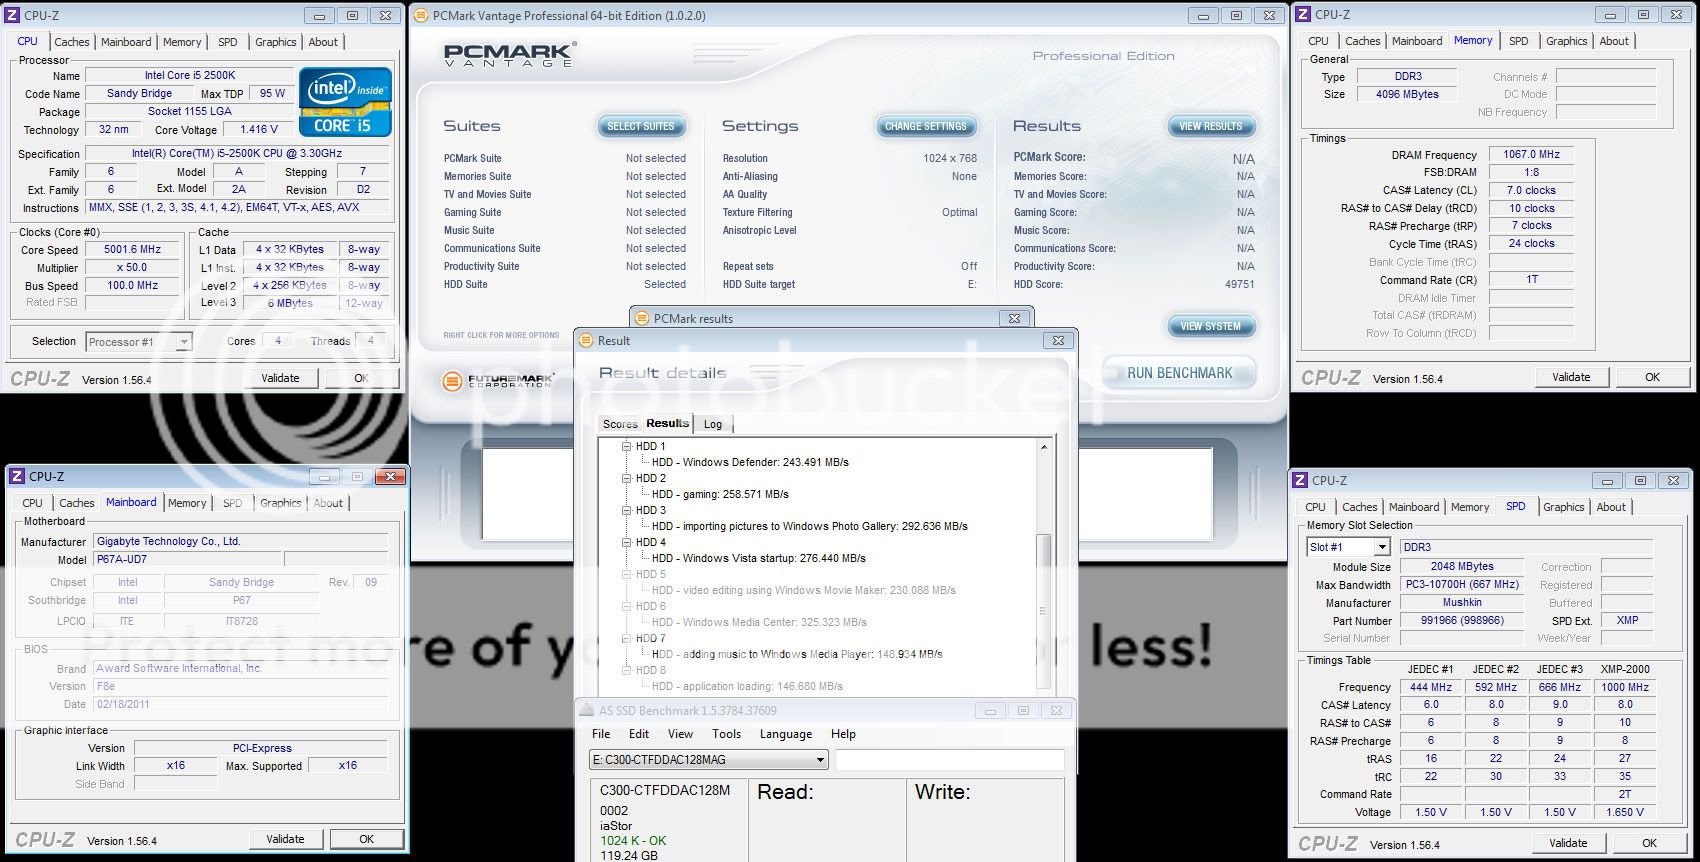
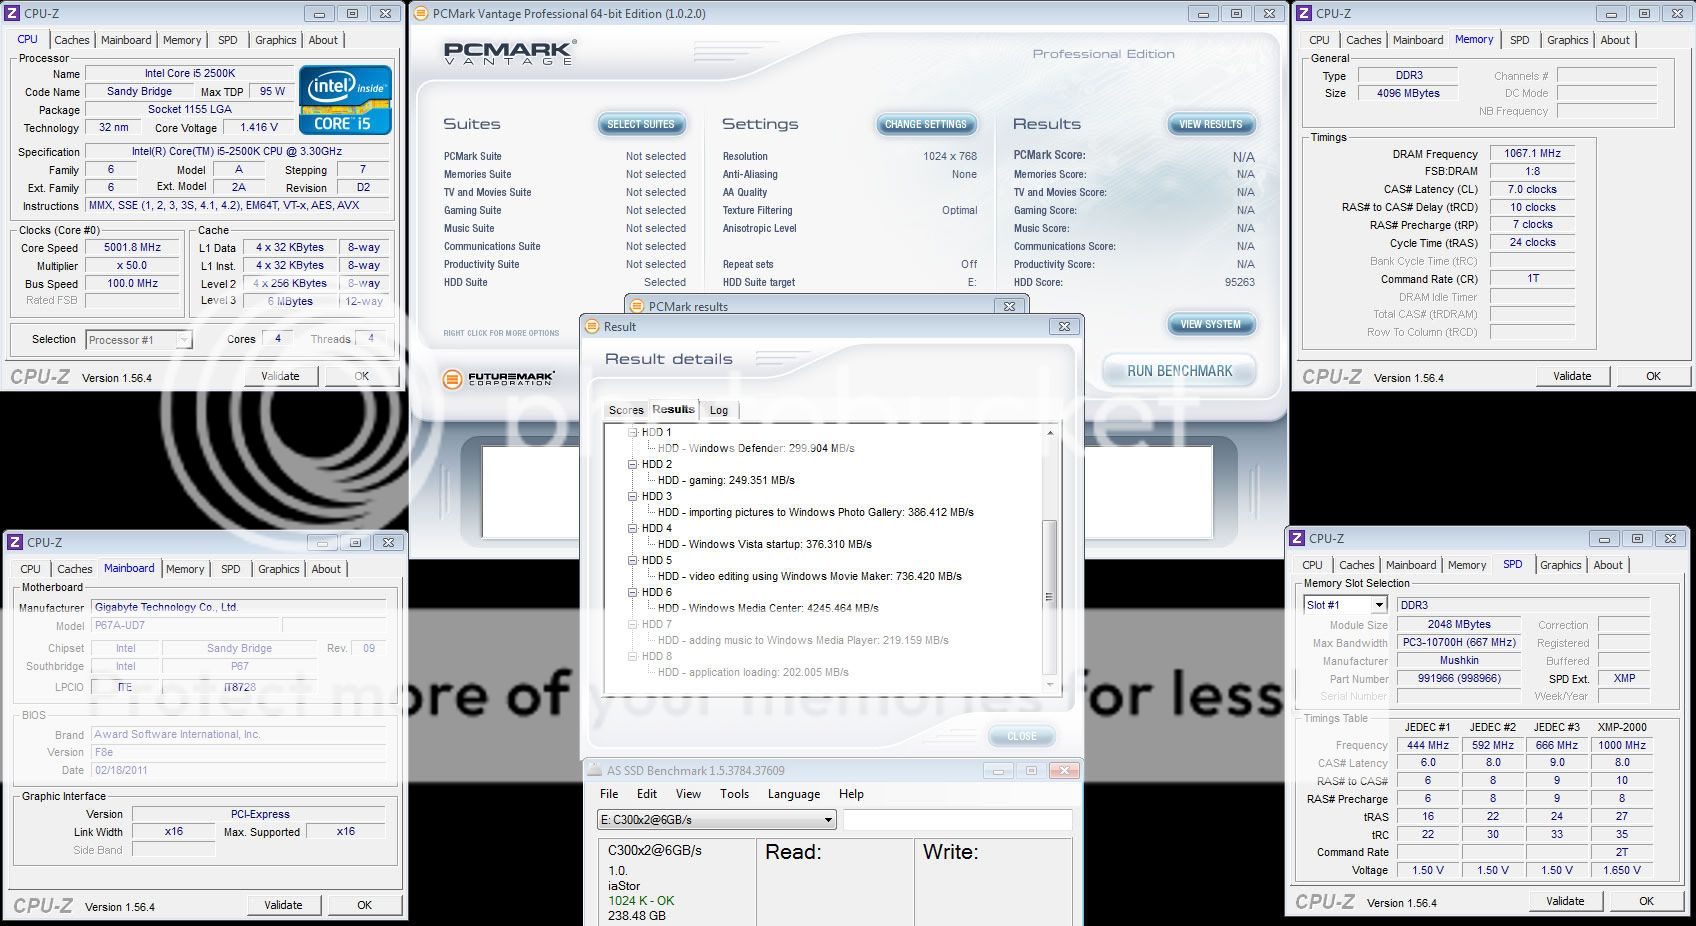
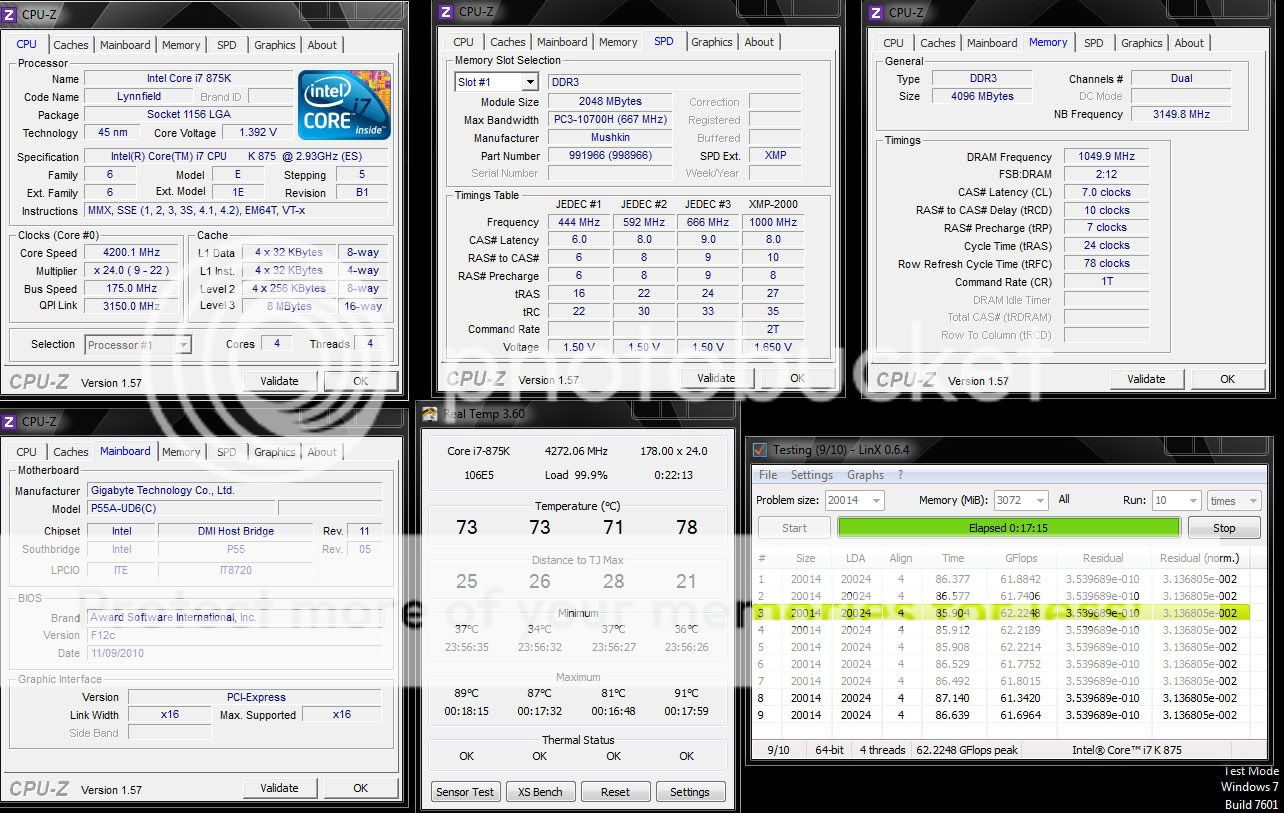
    In this article I'll be comparing the GA-P67A-UD7 motherboard against a GA-P55A-UD6 motherboard. These comparisons will include processor & memory performance, and graphics performance as well by using Crossfire with two GIGABYTE HD 5870's. This review will also show how Intel's new 6Gb/s SATA performance delivers, utilizing 3 Crucial C300 6GB/s solid state drives.

    The entire P67 based motherboard series was off to a rocky start due to the B2 Intel Chipset recall, but I was already more than halfway finished with data collection for this review at the time Intel made the recall announcement. The B2 motherboard performance is not affected, and there is nothing wrong with these boards except for the SATA 3GB/s issue which invoked the recall. So, we'll venture through this review as if we were unaware that there was a recall, however, I will go into further detail on this at the end of the review.


    Let's learn a little bit about GIGABYTE before we get into the review


    Originally posted by GIGABYTE
    GIGABYTE has over 20 years of manufacturing knowledge, thriving on delivering the latest technology to users around the globe. They develop, test, and manufacture a wide range of products following strict quality and environmental control standards. Their reputation as a pioneer in motherboard innovation has allowed them to diversify their product range to include graphics cards, notebooks, desktop PCs, PC components, cellular phones, server and datacenter solutions, and more.

    GIGABYTE was founded in 1986 in a small lab by four young engineers passionate to make their mark on the industry. GIGABYTE remains dedicated to the core belief of improving the lives of our users by manufacturing products that are high-performing, reliable, and of excellent quality.

    Here are some of GIGABYTE’s innovation highlights:

    USB 3.0 (2010): First motherboard manufacturer to release motherboards with USB 3.0 support. The 333 Onboard Acceleration Series, exclusively from GIGABYTE, offers the following features:
    * A USB 3.0 host controller (NEC) which is 10x faster than USB 2.0.
    * 3x USB Power Boost delivers superior compatibility and stability for USB devices, such as external storage devices or optical drives, by supplying sufficient power through a single USB port.
    * SATA 3.0 connection to double the performance of the hard disk.

    Ultra Durable™ Technology: First motherboard manufacturer to implement the following technologies.
    * All solid Japanese capacitors (2006) :
    o Long life and extended durability
    * Ferrite Core Chokes and Low RDS(on) MOSFETs (2007) :
    o Lower resistance for reduced power and heat consumption
    * Dynamic Energy Saver (2007):
    o Save energy with unique multi-gear power phase design
    * 2 oz copper PCB, (2008):
    o Cooler operating temperatures
    * 24-phase Power VRM (2009) :
    o Quicker response time, lower heat, more stable power supply to the CPU

    GPU Gauntlet Sorting:
    Proprietary analysis system that selects the highest quality GPUs destined for deployment on the Super Overclock Series graphics cards.

    Docking Netbook The Booktop (10”, M1022) is the first Netbook to include its own docking station for dual purpose use: lightweight portability and full-featured desktop functionality in the cradle.
    In addition, the 13” M1305 is the world’s first notebook to include a GPU inside a docking station. This provides an ultra-thin form factor as well as excellent graphics performance when plugged in at home or in the office.

    Introducing the Gigabyte GA-P67A-UD7 motherboard


    Features:


    Product Specification:
    CPUChipsetMemory
    1. 4 x 1.5V DDR3 DIMM sockets supporting up to 32 GB of system memory
    * Due to Windows 32-bit operating system limitation, when more than 4 GB of physical memory is installed, the actual memory size displayed will be less than 4 GB.
    2. Dual channel memory architecture
    3. Support for DDR3 2133/1866/1600/1333/1066 MHz memory modules
    4. Support for non-ECC memory modules
    5. Support for Extreme Memory Profile (XMP) memory modules

    Multi-Graphics Technology
    Support for 2-Way/3-Way ATI CrossFireX™/NVIDIA SLI technology

    AudioLAN
    1. 2 x Realtek RTL8111E chips (10/100/1000 Mbit)
    2. Support for Teaming
    3. Support for Smart Dual LAN

    Expansion Slots
    1. 2 x PCI Express x16 slots, running at x16 (PCIEX16_1, PCIEX16_2)
    * For optimum performance, if only one PCI Express graphics card is to be installed, be sure to install it in the PCIEX16_1 slot; if you are installing two PCI Express graphics cards, it is recommended that you install them in the PCIEX16_1 and PCIEX16_2 slots.
    2. 2 x PCI Express x16 slots, running at x8 (PCIEX8_1, PCIEX8_2)
    * The PCIEX8_1 slot shares bandwidth with the PCIEX16_1 slot and the PCIEX8_2 slot with PCIEX16_2. The PCIEX16_1/PCIEX16_2 slot will operate at up to x8 mode when the PCIEX8_1/PCIEX8_2 is populated.
    3. 1 x PCI Express x1 slot
    (All PCI Express slots conform to PCI Express 2.0 standard.)
    4. 2 x PCI slots

    Storage Interface
    Chipset:
    1. 2 x SATA 6Gb/s connectors (SATA3_0, SATA3_1) supporting up to 2 SATA 6Gb/s devices
    2. 4 x SATA 3Gb/s connectors (SATA2_2~SATA2_5) supporting up to 4 SATA 3Gb/s devices
    3. Support for SATA RAID 0, RAID 1, RAID 5, and RAID 10
    * When a RAID set is built across the SATA 6Gb/s and SATA 3Gb/s channels, the system performance of the RAID set may vary depending on the devices being connected.

    2 x Marvell 88SE9128 chips:
    1. 2 x SATA 6Gb/s connectors (GSATA3_6, GSATA3_7) supporting up to 2 SATA 6Gb/s devices
    2. Support for SATA RAID 0 and RAID 1
    3. 2 x eSATA 6Gb/s connectors (eSATA/USB Combo) on the back panel supporting up to 2 SATA 6Gb/s devices
    4. Support for SATA RAID 0 and RAID 1

    USB
    Chipset:
    1. Up to 8 USB 2.0/1.1 ports (4 on the back panel, including 2 eSATA/USB Combo, 4 via the USB brackets connected to the internal USB headers)

    2 x Renesas D720200 chips and 2 x VLI VL810 hubs:
    1. Up to 10 USB 3.0/2.0 ports (6 on the back panel, 4 via the USB brackets connected to the internal USB headers)
    * The USB 2.0 signals of the 6 USB 3.0/2.0 ports on the back panel are from the Chipset.

    Internal I/O Connectors
    1. 1 x 24-pin ATX main power connector
    2. 1 x 8-pin ATX 12V power connector
    3. 4 x SATA 6Gb/s connectors
    4. 4 x SATA 3Gb/s connectors
    5. 1 x CPU fan header
    6. 3 x system fan headers
    7. 1 x power fan header
    8. 1 x Chipset fan header
    9. 1 x front panel header
    10. 1 x front panel audio header
    11. 1 x S/PDIF Out header
    12. 2 x USB 2.0/1.1 headers
    13. 2 x USB 3.0/2.0 headers
    14. 1 x IEEE 1394a header
    15. 1 x clearing CMOS button
    16. 1 x power button
    17. 1 x reset button

    Back Panel Connectors
    1. 1 x PS/2 keyboard/mouse port
    2. 1 x optical S/PDIF Out connector
    3. 1 x coaxial S/PDIF Out connector
    4. 2 x IEEE 1394a ports
    5. 2 x USB 2.0/1.1 ports
    6. 6 x USB 3.0/2.0 ports
    7. 2 x eSATA/USB Combo connectors
    8. 2 x RJ-45 ports
    9. 6 x audio jacks (Center/Subwoofer Speaker Out/Rear Speaker Out/Side Speaker Out/Line In/Line Out/Microphone)

    Form Factor
    ATX Form Factor; 30.5cm x 24.4cm


    For full features and product specifications please visit the GA-P67A-UD7 product web page:
    GIGABYTE GAP67A-UD7 Overview


    Product Images:

    Packaging & Accessories


    The UD7's large packaging is designed in a very shiny gold and black theme, matching the actual motherboard color scheme. On the front of the box you can see the design of the motherboard itself, showcasing the black PCB and gold accented heatsinks. Also noted on the front is GIGABYTE's 2X Copper PCB notation peeling up from the corner, and there is a unlocked performance label indicating that this board delivers maximum CPU power. Three year warranty for USA and Canada owners is also noted on the front of the box.

    On the reverse is a mock-up of the motherboard detailing many of the features. GIGABYTE's main technology points are also noted on the back, Ultra Durable 3 (Featuring 2x Copper PCB), 24-Phase power design delivering Maximum CPU power, on-board 333 acceleration (USB 3.0, 3X USB power delivery, and SATA 3.0). 3-way graphics is noted as well, along with ON/OFF charge, Smart 6, Auto Green, XHD (Xtreme Hard Drive), and eSATA/USB combo.


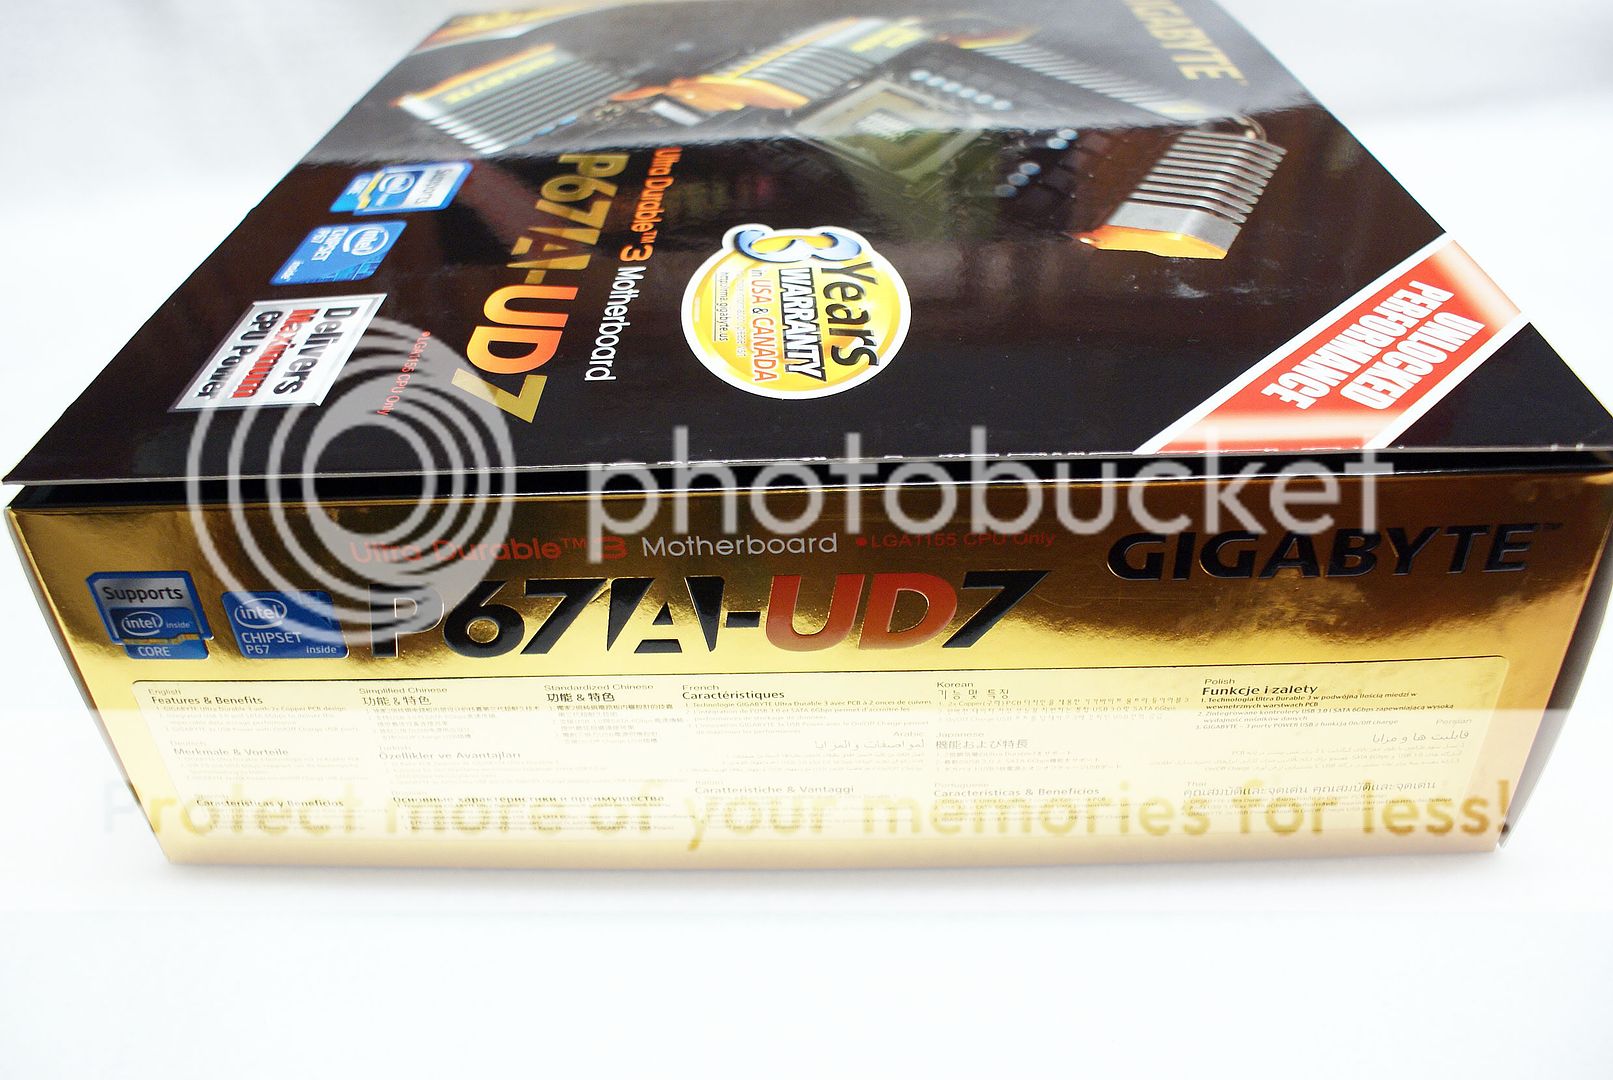
    In shining gold on the sides the model name is noted, along with the chipset used and CPU compatibility. On the other side in several languages is noted 3 major benefits (Ultra Durable 3, USB3 and SATA 6Gb/s, and USB ON/OFF charge for phones and other USB Devices).


    This package has a fold-out front cover, secured into place with Velcro dots. On the inside of the flap is more details on the major advantages of this board, 24-Phase power, USB 333, 3-way graphics, Smart6, Smart Recovery 2, Smart Dual LAN, Debug LED, and precision OV. On the right side, under the cover there is a window that allows you to see the motherboard inside the box. The heatsink design is also shown here with several images indicating it's unique looks and how air flows through each section.


    The GA-P67A-UD7 motherboard packing is very large, almost twice as thick and taller than a normal motherboard package.


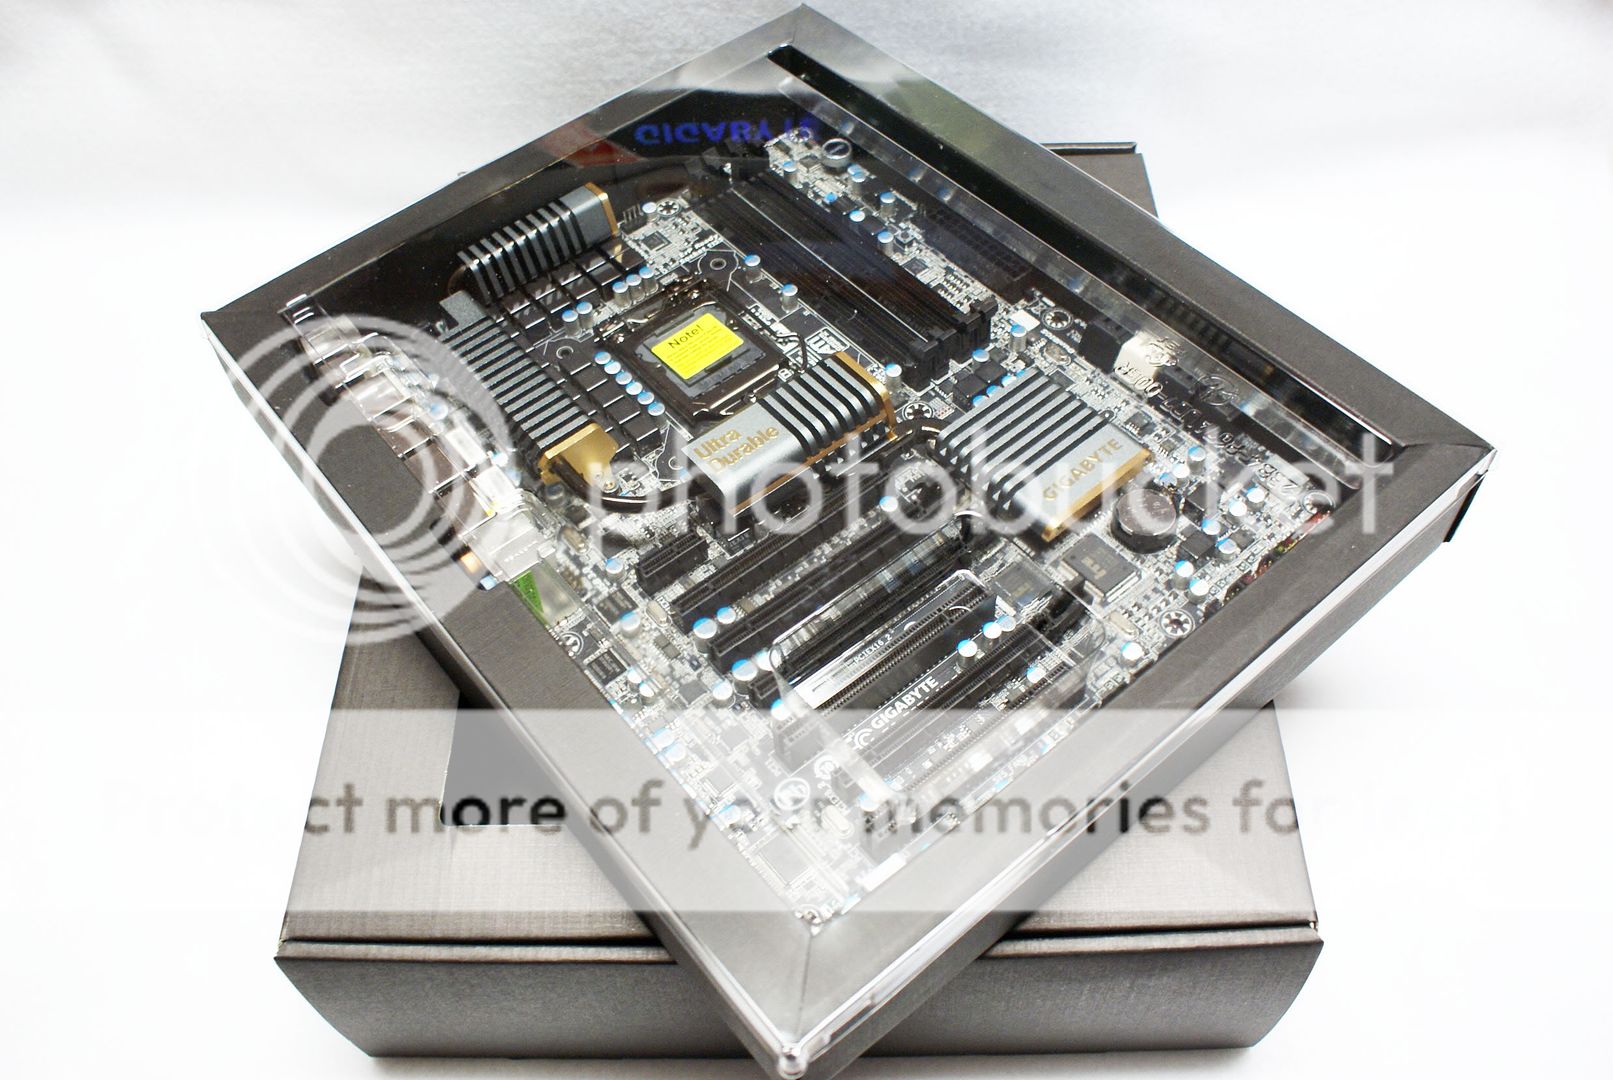
    Inside the outer packaging is a separate black box with handle, this has a large window and the entire motherboard is visible as soon as you remove it from the main packaging. Inside this box is another smaller case-like box to protect or display the motherboard. This is a very unique idea from GIGABYTE, always standing out in the crowd!


    Under the motherboard box is a third smaller box containing all of the accessories, I/O shield, blue SATA Cables, stickers, two SLI cables (one Hard PCB Based), external eSATA brackets & cables, and the motherboard CD & manuals.


    Motherboard


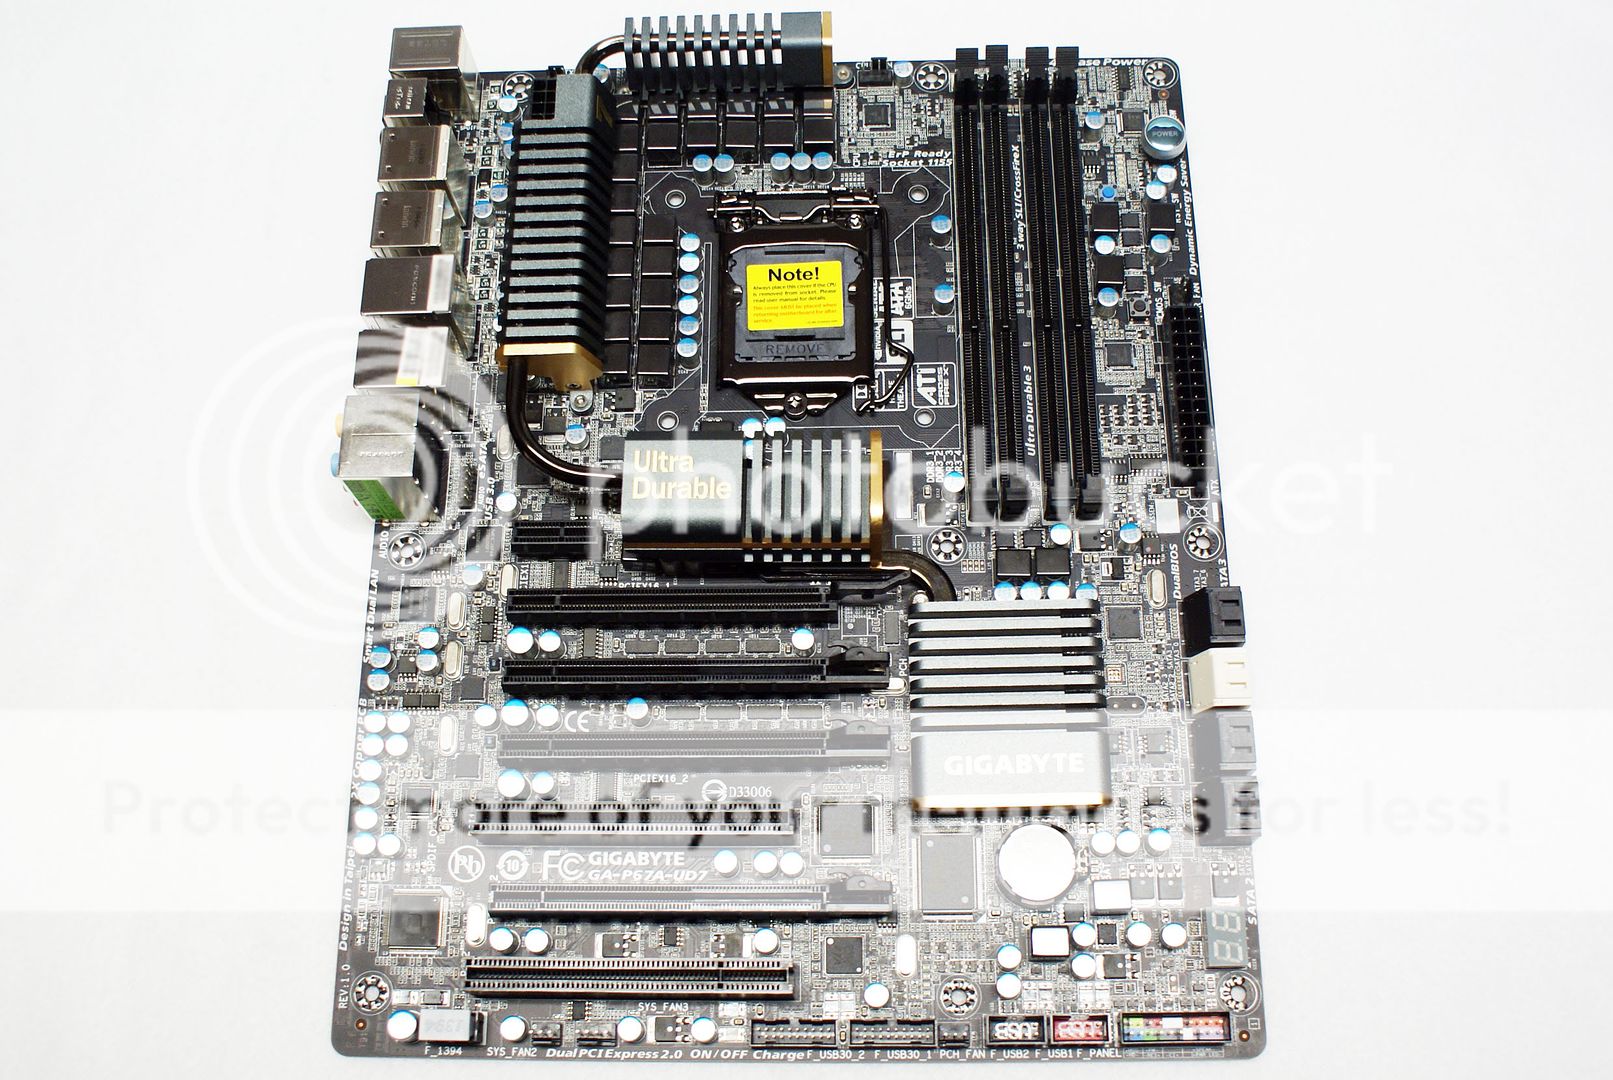
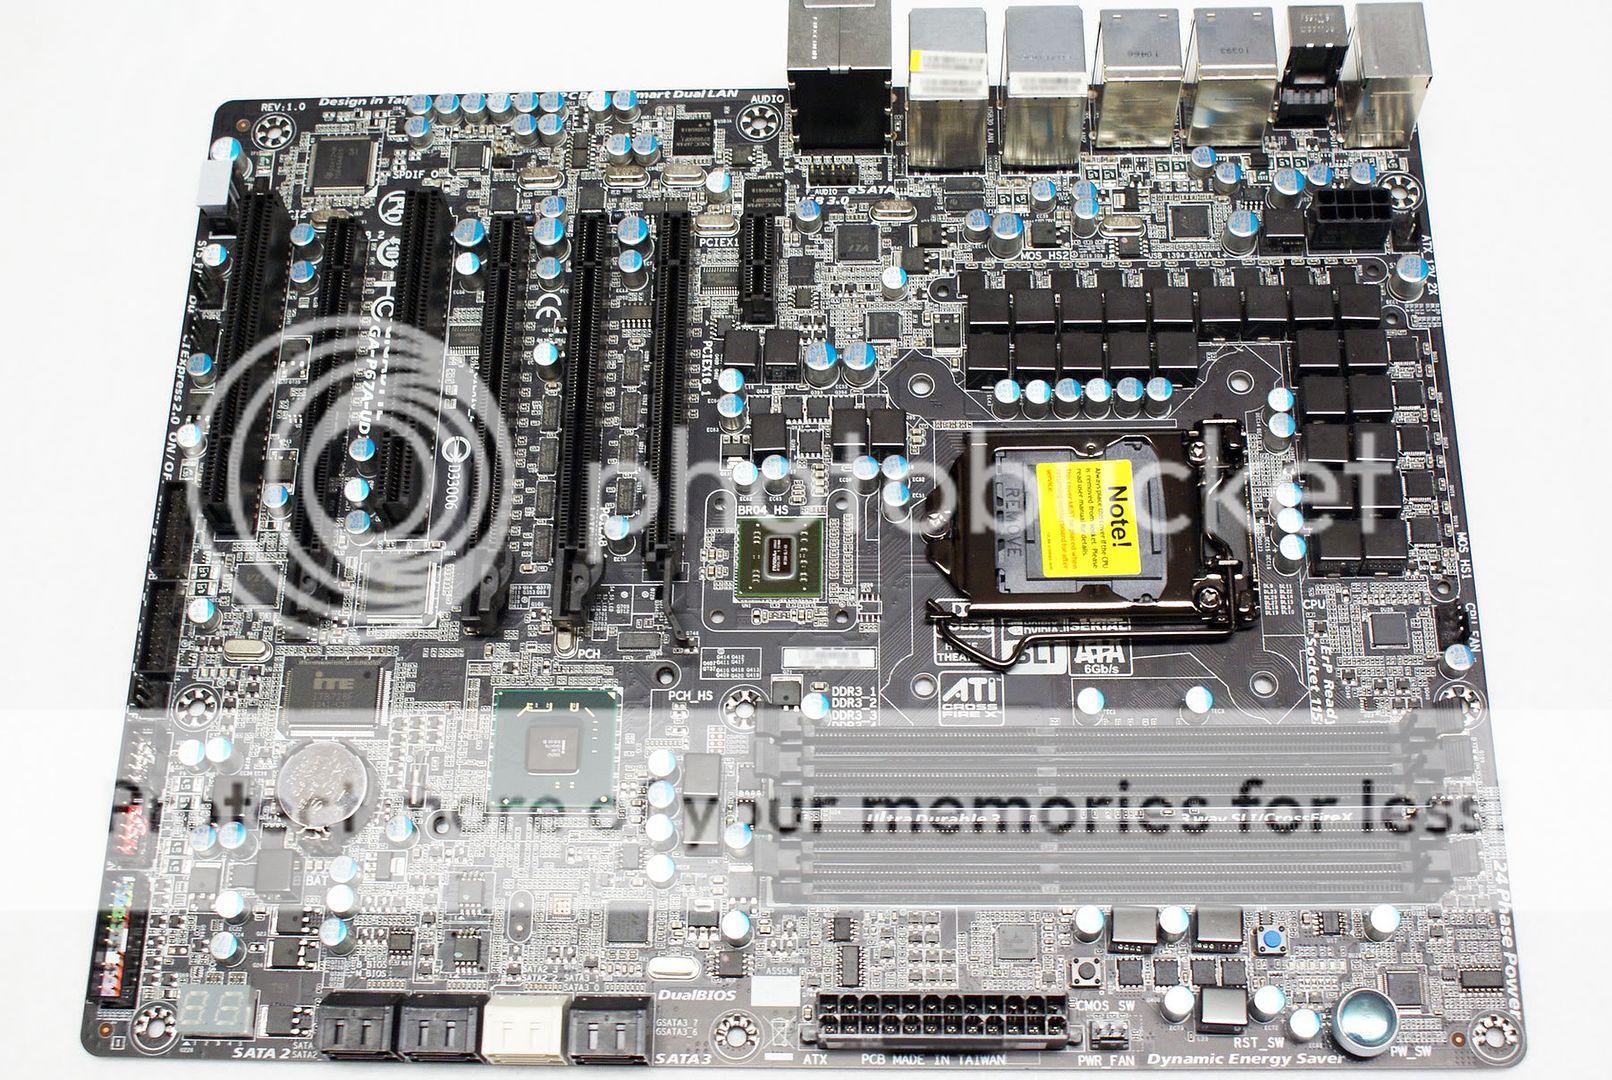
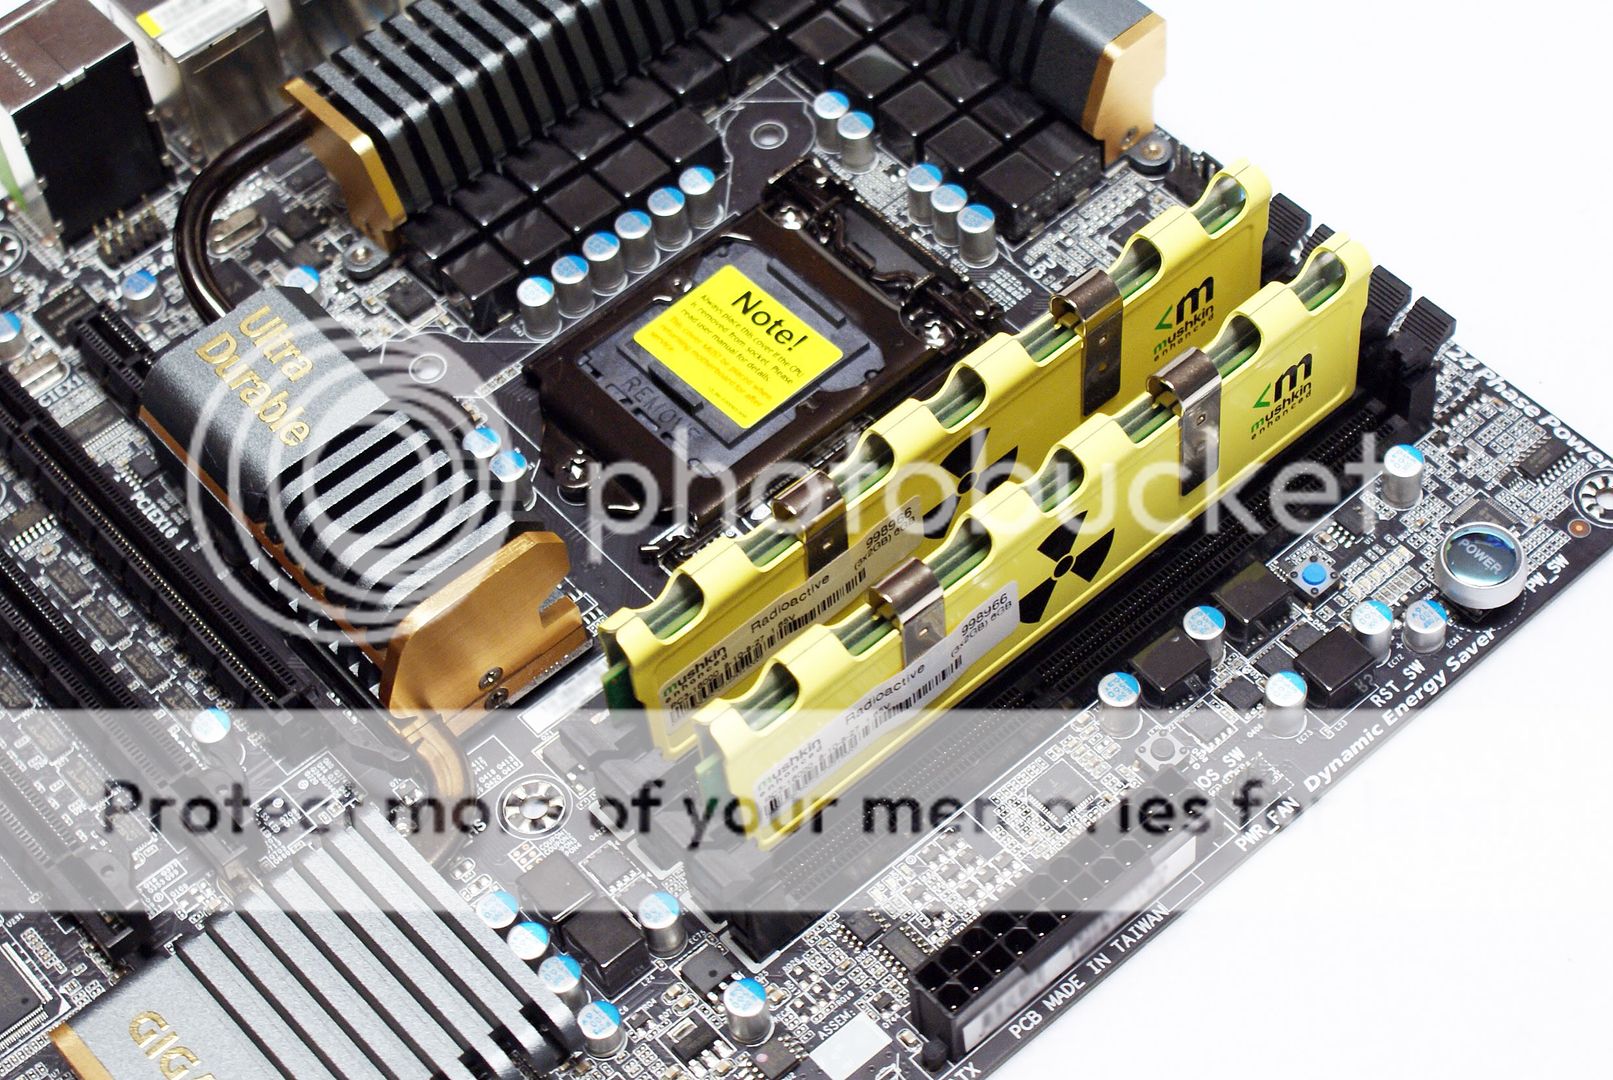
    Here you can see the GA-P67A-UD7 itself, adorning the new matte black PCB from GIGABYTE. The color scheme is almost all black, having only golden accents on the heatsinks, which are gray in color. On the PCH heatsink in gold is the GIGABYTE name, Ultra Durable is noted on the NB (NF200) heatsink, and on the IO side mosfet heatsink the number 7 is shown. GIGABYTE used all black memory and PCI/PCIE slots to match the black PCB.


    On the reverse you can see that only screws are used to hold the heatsinks down onto the motherboard, no plastic push-pins here! You can also see that the new matte black PCB from GIGABYTE is just that, black, without any ugly brown copper traces showing through. Brown showing through black makes me cringe when looking at other black PCB motherboards. GIGABYTE has the right idea with their implementation of black PCB, and it's nice to see they were thinking outside of the box and didn't just jump on the black PCB bandwagon without thinking ahead.


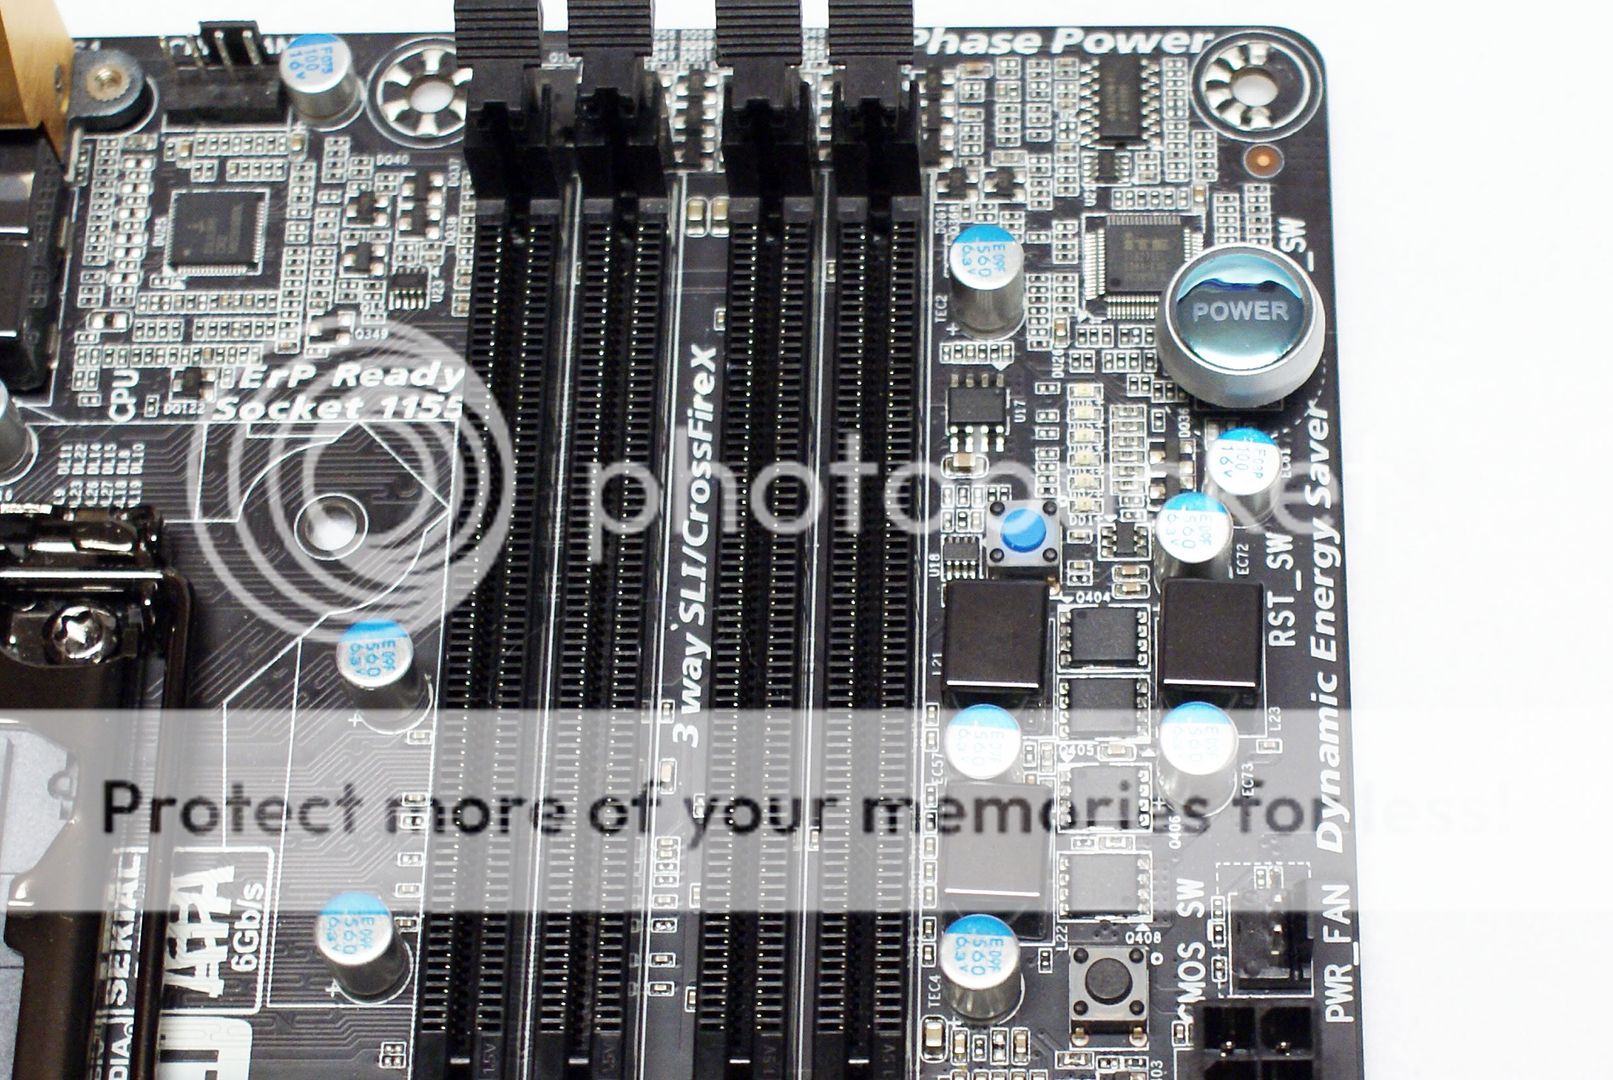
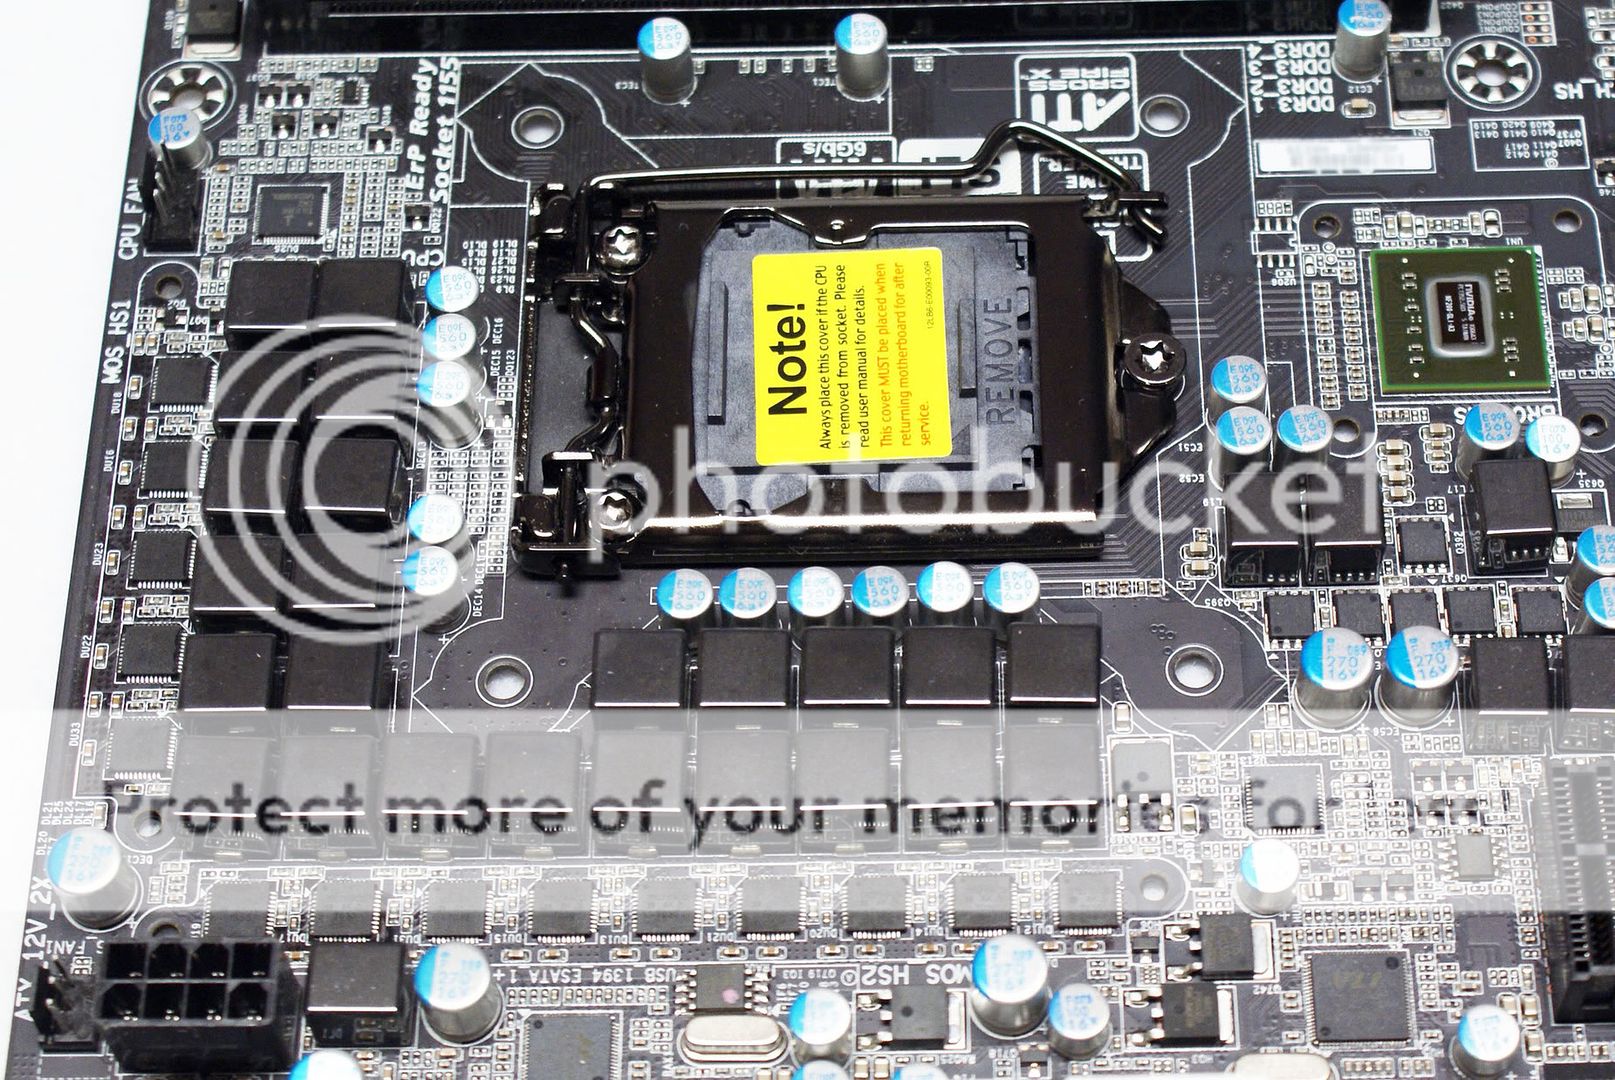
    You can see the CPU socket area is designed with the largest of heatsinks in mind, I think almost any heatsink would fit into this area. In the bottom right corner you can see there is a debug LED on this board, and two front USB 3.0 connectors. There is no front panel USB 3.0 bay device included with the motherboard though, and I have yet to see any worthy offerings via retail channels. So I am unsure how end users are supposed to take advantage of this feature yet, but it is nice to know it's there for future use.


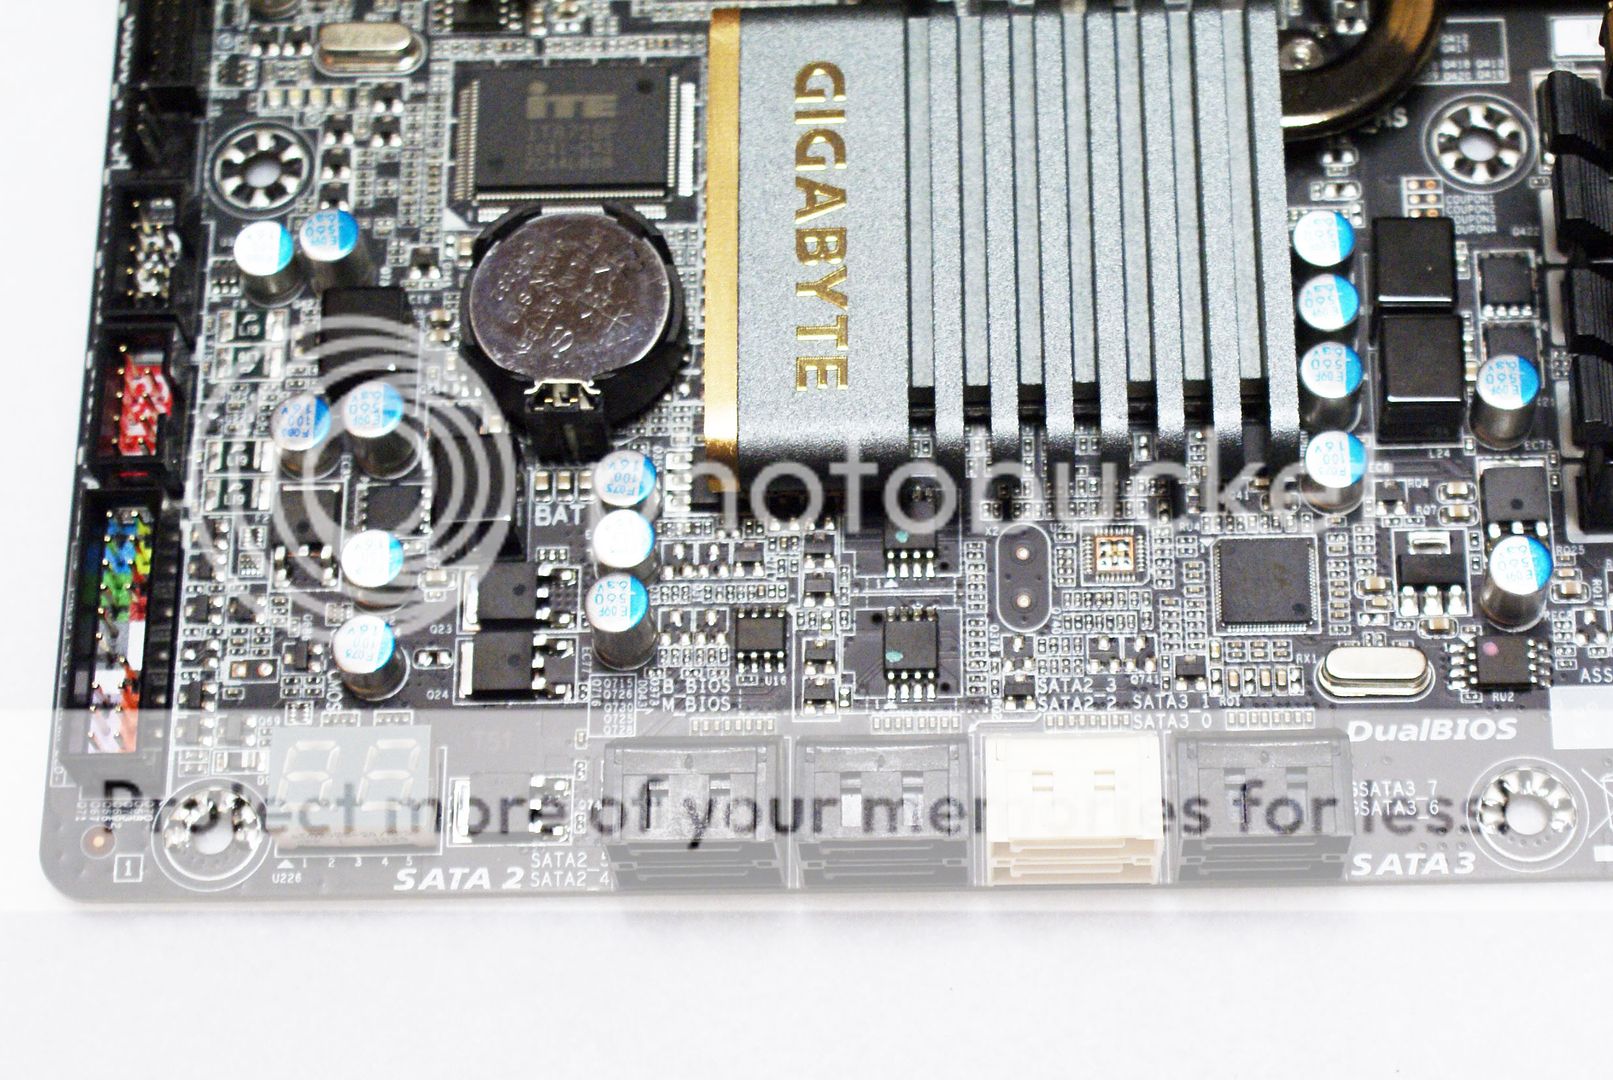
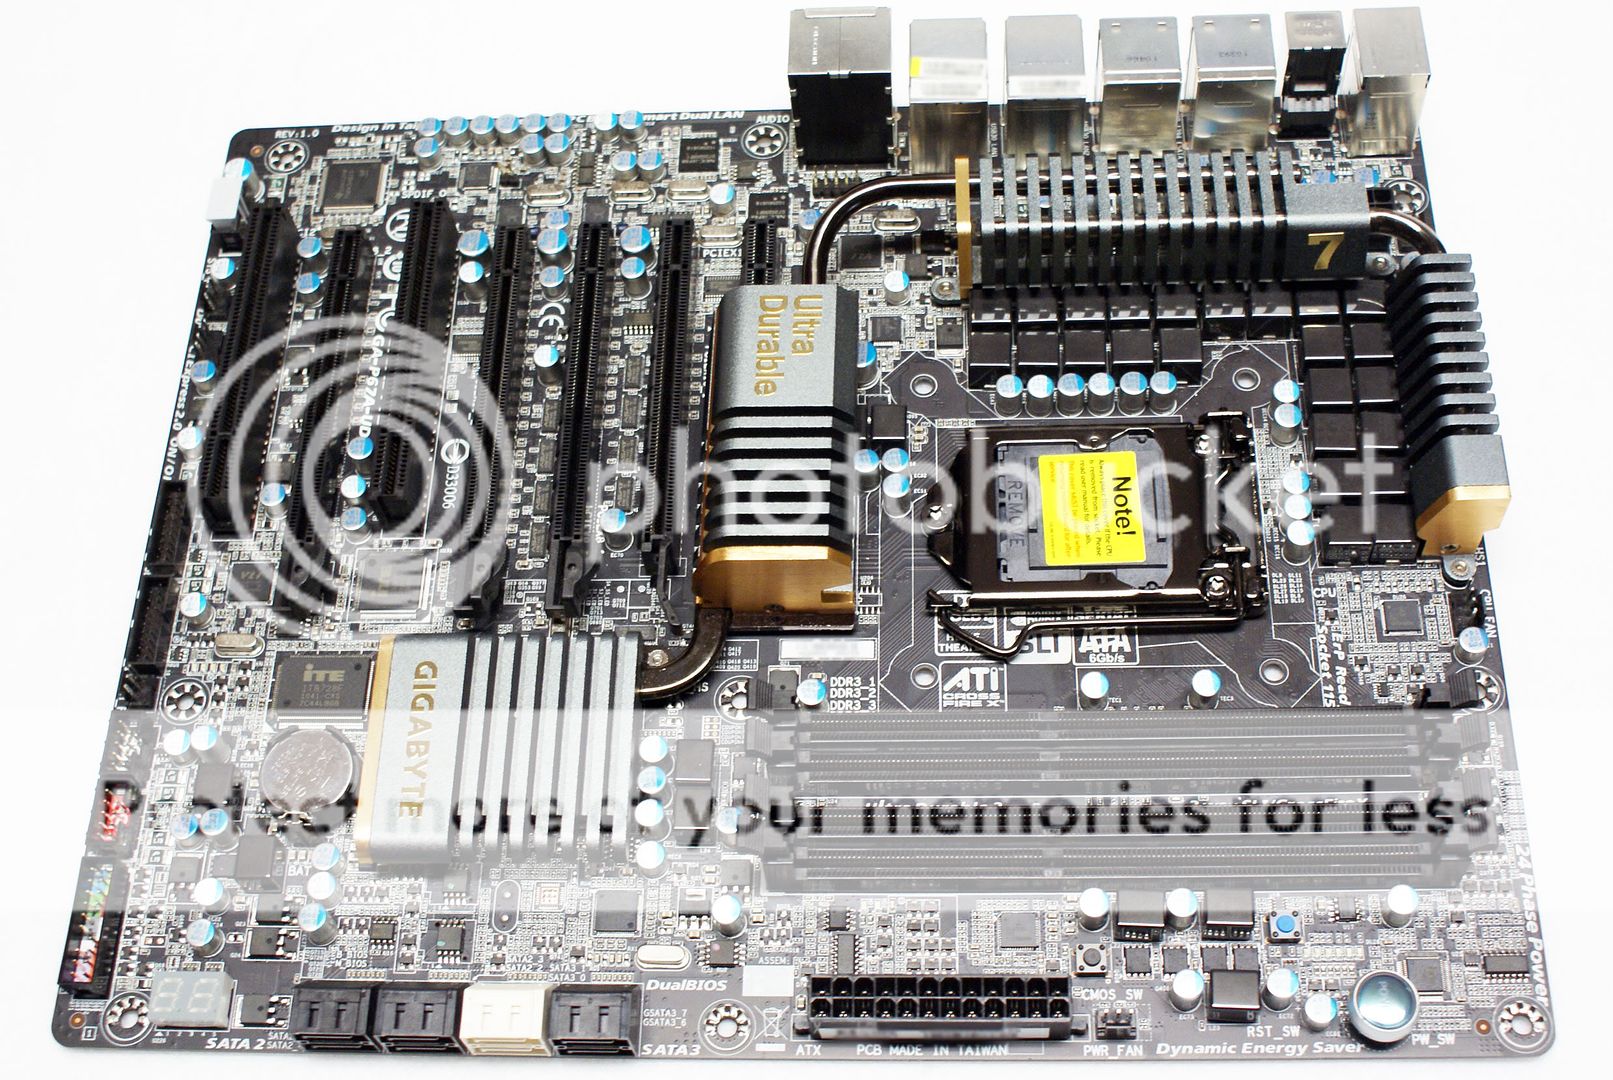
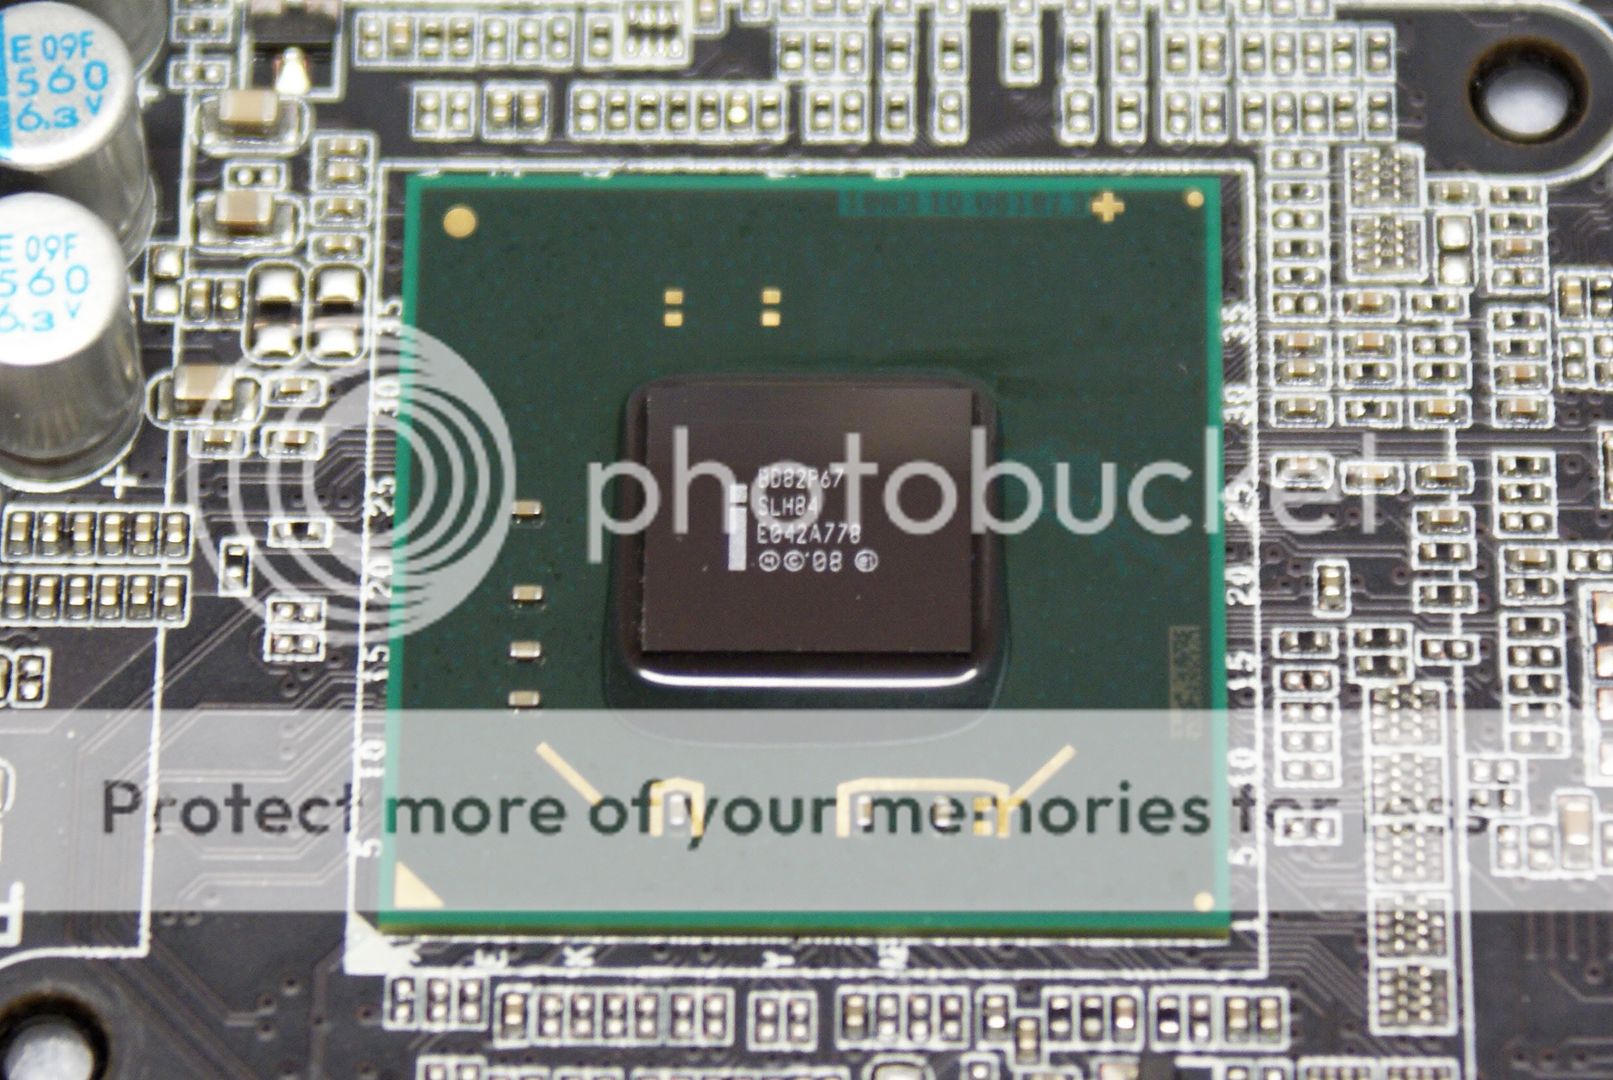
    Here you can see the debug LED again, this is a very helpful feature when you are having POST issues. You can also see that this board has 8 internal SATA Connections. The 4 lower black ones are Intel 3GB/s ports, these are the ports that are affected by the B2 chipset flaw. The two middle white ports are Intel 6Gb/s port, finally! And the two top black ports are controlled by a Marvell 9128 6Gb/s chip.


    The I/O panel is feature full! Offering a mouse or keyboard PS2 connection, 1 optical and one coaxial S/PDIF connector, two 1394a firewire ports, 6 USB 3.0/2.0 ports, 2 USB 2.0/1.1 ports, 2 eSATA/USB combo ports, dual LAN connections, and 6 x audio connections supporting up to 7.1 channel HD audio.
    Last edited by Lsdmeasap; 03-09-2011, 03:44 AM.

  • #2
    Re: GIGABYTE GA-P67A-UD7 Review Featuring 6Gb/s RAID/USB3 Testing

    Heatsinks Removed


    Here you can see the heatsinks and heatpipe combo has been removed. On the bottom we can see that thermal paste was used on the NB (NF200) chip and on the PCH heatsink, the heat from the driver mosfets is transferred to the heatsinks and heatpipe via thermal padding.


    Here is full detailed shots of the board naked, click to enlarge if you would like to see anything up close. I do not have the technical skills to go in depth and discuss each IC or chip used on the board, but if you are interested or knowledgeable about these items and would like to know what products are used you can easily view them all from these images.


    Here is the CPU socket area bare, you can see GIGABYTE's 24 Phase VRM power design, and the new driver mosfets. Also noted on the reverse of the board you can see that this board uses an 8 layer PCB design.


    Up close and personal, here is the Intel P67 chipset, and the Nvidia NF200 chipset which is what gives this board additional PCIE lanes over the other lower priced P67 motherboards. This allows this board to run 3-way SLI or crossfire at x16/x16/x8 or 2-way at x16/x16, it is also possible to run 4 way crossfire at x8/x8/x8/x8 on this board.


    CPU Heatsink & Memory Installation

    Heatsinks used are as follows:


    Scythe SCSK-1100 100mm Shuriken Rev. B 3 Heat Pipes CPU Cooler

    Fan Dimensions -- 100 L x 100 W x 12 H mm
    Heatsink Dimensions -- 105 L x 116 W x 64 H mm

    Thermalright MUX-120 Heatpipe CPU Cooler

    Heatsink Dimensions -- 133 L x 58 W x 160 H mm
    Fan Dimensions -- 120 L x 120 W x 25 H mm


    The Scythe Shuriken is a low profile cooler, and as you can see using larger memory modules with certain low profile coolers may be an issue. There may not be room to install or remove memory with the first, or possibly even the second memory slot, depending on what cooler you are thinking of using, and what order you install the heatsink and memory.


    This cooler partially hovers over the first memory slot, but many average sized memory modules would not have a problem fitting underneath it. If you are thinking of a low profile cooler, or one that is on the wide side, please look at the board and heatsink measurements before making your purchase so that you do not run into any fitment issues.


    This is normal fan placement on a Thermalright MUX, I have not used a Thermalright Extreme (TRUE) or other variants, but I assume that they have a similar fan placement. In the normal fan position larger memory modules may cause issue or be pushed aside slightly by the fan, if using a fan on the memory side of the heatsink. It could also cause memory installation issues depending on the order you install everything, however, as you will see below with most of the tower type CPU coolers like this you can adjust the fan's placement.


    Simply adjusting the memory side fan on this cooler, to be slightly raised from normal position, allows for much taller memory modules to be used without an issue. You would be able to remove and re-install memory with your fan adjusted in this position without any problems.


    Memory Color Appearance Against New Black Matte PCB


    This is the Mushkin Radioactive memory used for this review, it looks very good with GIGABYTE's new black PCB.


    Mushkin's Copperhead memory look great with this board, almost as if they were made for each other, which is why I used this memory for the introduction image of this review. Memory with black heat spreaders look great as well.


    Blue or red memory modules look great too, I'm sure any color would go perfectly with the new black PCB.


    Quick Look @ BIOS:


    GIGABYTE's BIOS offers a quick and easy way to look at the current status of your CPU and memory, also showing each core's turbo status. The BIOS version is shown, along with the CPU and memory frequency, and total installed memory size. The CPU temperature is shown here too, as is the current Vcore and Dram voltage.


    Here is the main overclock section, allowing you to adjust the CPU multiplier or FSB speed, and set the memory speed or enable a XMP profile. GIGABYTE now also offers per core CPU multiplier adjustments as well in the advanced CPU core settings section, along with enabling or disabling real time multiplier changes in the OS. Internal CPU PLL adjustment setting, allowing higher CPU multiplier, is only currently available in Beta BIOSes.


    Here you can see GIGABYTE offers MANY advanced memory timings to be manually adjusted, there are several others not shown here as well. This board offers 4 Load-Line Calibration settings (Auto, Disabled, Level 1 & Level 2). Here you can adjust the Vcore, QPI/Vtt, System Agent Voltage, PCH voltage, CPU PLL, memory voltage along with several memory voltage sub options.

    Vcore voltage is adjustable in the following manner: 0.75V - 1.7V @ 0.005V increments *

    QPI/Vtt voltage (VCCIO) is adjustable in the following manner: 0.80V - 1.7V @ 0.020V increments *

    System Agent (VCCSA) voltage is adjustable in the following manner: 0.655V - 1.305V @ 0.010V increments *

    Dram (Memory) voltage is adjustable in the following manner: 0.90V - 2.60V @ 0.020 increments


    * Increments may vary between CPU models, I know ES and Retail vary on this board, and I have seen 1366 CPU's that vary between models as well.


    Testing

    Programs used for testing:

    Futuremark 3dmark 06 Professional v. 1.2.0


    Originally posted by Futuremark
    Futuremark is the world leader in 3D, mobile and PC benchmarking. Our 3DMark and PCMark lines of PC benchmark software.

    3DMark06 is a PC benchmark suite designed to test the DirectX9 performance of your graphics card. A 3DMark score is an overall measure of your system’s 3D gaming capabilities, based on comprehensive real-time 3D graphics and processor tests.
    Futuremark - Benchmarks - 3DMark06 - Download


    Futuremark 3DMark Vantage Professional v. 1.0.1


    Originally posted by Futuremark
    3DMark Vantage is a PC benchmark suite designed to test the DirectX10 performance of your graphics card. We’ve been making 3DMark for over 10 years, with each new edition using the latest 3D technology to determine real-world performance.

    A 3DMark score is an overall measure of your system’s 3D gaming capabilities, based on comprehensive real-time 3D graphics and processor tests. By comparing your score with those submitted by millions of other gamers you can see how your gaming rig performs, making it easier to choose the most effective upgrades or finding other ways to optimize your system.
    Futuremark - Benchmarks - 3DMark Vantage - Download


    Futuremark 3DMark 11 Professional v. 1.0.1


    Originally posted by Futuremark
    3DMark 11 is the latest version of the world’s most popular benchmark. Designed to measure your PC’s gaming performance 3DMark 11 makes extensive use of all the new features in DirectX 11 including tessellation, compute shaders and multi-threading. Trusted by gamers worldwide to give accurate and unbiased results, 3DMark 11 is the best way to consistently and reliably test DirectX 11 under game-like loads.
    Futuremark - Benchmarks - 3DMark 11


    Fritz Chess Benchmark V. 4.3 (From Deep Fritz 12)


    This benchmark runs an internal chess based test on your system and give you values for the speed relative to a benchmark processor (P3, 1.0 GHz) and the average nodes-per-second count which you can compare these values for different hardware configurations.

    Fritz ChessBase - Chess Benchmarking


    Geekbench V. 2.1.12 x86


    Originally posted by Geekbench
    Geekbench provides a comprehensive set of benchmarks engineered to quickly and accurately measure processor and memory performance. Designed to make benchmarks easy to run and easy to understand, Geekbench takes the guesswork out of producing robust and reliable benchmark results.
    Primatelabs - Geekbench


    Super PI Mod XS 1.5V


    SuperPI is a quick reference benchmark test often used when overclocking or comparing different hardware configurations.

    Originally posted by Wiki
    Super PI is a computer program that calculates pi to a specified number of digits after the decimal point - up to a maximum of 32 million. It uses Gauss–Legendre algorithm and is a Windows port of the program used by Yasumasa Kanada in 1995 to compute Pi to 232 digits. Super Pi is used by many overclockers to test the performance and stability of their computers. In the overclocking community, the standard program provides a benchmark for enthusiasts to compare "world record" pi calculation times and demonstrate their overclocking abilities. The program can also be used to test the stability of a certain overclock speed. If a computer is able to calculate PI to the 32 millionth place after the decimal without mistake, it is considered to be moderately stable in terms of RAM and CPU. However, longer tests with other CPU/RAM intensive calculation programs will run for hours instead of minutes and may better stress system stability. While Super Pi is not the fastest program for calculating Pi (see software for calculating p for faster alternatives), it remains very popular in the hardware and overclocking communities.
    Wikipedia - Super PI

    Super PI Mod XS 1.5 Download - Techpowerup


    wPrime V. 1.55


    Originally posted by wPrime.net
    wPrime is a leading multithreaded benchmark for x86 processors that tests your processor performance by calculating square roots with a recursive call of Newton's method for estimating functions, with f(x)=x2-k, where k is the number we're sqrting, until Sgn(f(x)/f'(x)) does not equal that of the previous iteration, starting with an estimation of k/2. It then uses an iterative calling of the estimation method a set amount of times to increase the accuracy of the results. It then confirms that n(k)2=k to ensure the calculation was correct. It repeats this for all numbers from 1 to the requested maximum.
    wPrime Download - wPrime.net


    AIDA64 v1.50.1236 Beta


    Previously known as Everest Ultimate, this also is a great program, and everyone should have a copy. It is not so much a testing tool for our purposes, but it provides multiple stability tests, various bandwidth test, and in-depth system hardware information. For this review it will only be used to provide simple bandwidth and latency test results at each frequency.

    AIDA64 | PC Benchmark | System Diagnostics | Network Inventory


    ATTO V. 2.34


    ATTO has been a major disk testing utility for many users, for quite some time, offering the ability to test performance using various transfer sizes and test lengths for reads and writes. It also offers several options to customize your benchmark testing including queue depth, overlapped I/O, a comparison mode and the option to run the test continuously.

    This benchmark will be used to compare SSD and USB performance.

    ATTO Disk Benchmark Download - ATTOtech.com
    Last edited by Lsdmeasap; 03-09-2011, 03:46 AM.

    Comment


    • #3
      Re: GIGABYTE GA-P67A-UD7 Review Featuring 6Gb/s RAID/USB3 Testing

      CrystalDiskMark V. 3.0.0f


      CrystalDiskMark is another staple in the disk benchmarking world, offering measurement of sequential read and writes speeds, random 512KB, 4KB, 4KB (Queue Depth=32). Users may also select the method of how data is tested, random, 0Fill, or 1Fill - in the testing done for this review only the default testing method was used - Random Data.

      This benchmark will be used to compare SSD and USB performance.

      CrystalDiskMark Download - Crystalmark.com


      AS SSD Benchmark V. 1.5.3784.37609


      AS SSD benchmark is the latest and most commonly accepted SSD testing program, it determines the performance of solid state drives (SSD) based on many factors. The tool contains five synthetic as well as three practical copy tests (ISO, Program, Games).

      AS SSD Solid State Disk Benchmark Download - Alex-is DOT de


      PCMark Vantage Professional x64 V. 1.0.2.0


      PCMark Vantage is a PC benchmark suite designed for Windows Vista offering one-click simplicity for casual users and detailed, professional grade testing for industry, press and enthusiasts.

      A PCMark score is a measure of your computer’s performance across a variety of common tasks such as viewing and editing photos, video, music and other media, gaming, communications, productivity and security.
      The HDD Suite uses a variety of real world hard drive tests to simulate various tasks, such as virus scanning, gaming, application loading, importing files, and media editing.

      HDD Test Features:

      * 6 HDD Tests total
      * HDD Tests use new 4K block size
      * All HDD Tests use RankDisk using Intel’s IPEAK Storage Performance Toolkit
      * WinTrace is used to record the HDD tracesAnalyzeTrace is used to analyze precisely what the traces are doing
      * RankDisk: a Futuremark modified version that it is non-destructive and runs in a temporary sandbox file.

      HDD Suite includes the following tests:
      HDD 1 - Windows Defender
      HDD 2 - HDD: Gaming
      HDD 3 - HDD: Importing pictures
      HDD 4 - HDD: Windows Vista start-up
      HDD 5 - HDD: video editing
      HDD 6 - HDD: Media Center
      HDD 7 - HDD: Adding music to Windows Media Player
      HDD 8 - HDD: Application loading

      Futuremark - Benchmarks - PCMark Vantage


      LinX 0.6.4


      This tests and measures (In GFlops) your CPU and memory floating point computing power using Intel's LinPack Binaries with linear algebra. Many users consider this program to be a standard of stability, however, often you may see my advice against the use of it in long or large period runs. This program is very hard on systems, and may overheat the CPU, or push it into extremes it would not otherwise see, and can cause unintended permanent damage or degradation. My advice on this program is to use it sparingly, as you will see I only use 10x passes for this review and only at lower CPU frequencies. There are other less harmful ways to test for stability such as Prime95 and HCI Memtest.

      The updated Linpack binaries linked below can be used to update LinX to utilize the latest Intel Linpack instruction sets, including the new AVX instruction set introduced with Sandy Bridge processors.

      LinX - A simple Linpack interface - XtremeSystems Forums


      Testing Setup


      Please excuse my mess here, I just purchased this benching station and was in the middle of three reviews at the time I took this image.

      Hardware used in tests:
      GIGABYTE GA-P67A-UD7 1155 Motherboard - BIOS F7e & F8e Used
      GIGABYTE GA-P55A-UD6 1156 Motherboard - BIOS F12c Used
      Intel i5-2500K Quad-Core CPU (ES D2)
      Intel i5-2500K Quad-Core CPU (Retail - Temps)
      Intel 875K 1156 Quad-Core CPU ES
      Mushkin Radioactive 998966 6GB 20000Mhz (PC3-16000) 8-10-8-27 Triple Channel DDR3 Memory Kit (4GB used)
      Crucial RealSSD C300 128GB 6Gb/s SSD X 3
      GIGABYTE 5870 SOC GV-R587SO-1GD 1GB Graphics Card - Crossfire
      GIGABYTE 5870 OC GV-R587OC-1GD 1GB Graphics Card (Flashed to SOC BIOS) - Crossfire
      SuperTalent 16GB USB3.0 Express Duo Flash Drive
      Ultra X3 ULT40312 850W Power Supply


      Benchmark & Testing Results

      Futuremark 3dmark 06 Professional v. 1.2.0


      The 2500K and P67 motherboard clearly overtake the 875K/P55 combo, even with HT on and being at a higher frequency, the P67 setup comes out on top.


      Futuremark 3DMark Vantage Professional v. 1.0.1


      P55 setup is leading the way here with HT on, but falls behind the P67 once HT is disabled, making the per core comparisons even. At 5Ghz, which is easily usable on air with these motherboards, the P67 jumps ahead of the P55 even though it has HT enabled for 8 cores.


      Futuremark 3DMark 11 Professional v. 1.0.1


      P67 and 2500K are the obvious leaders here jumping far ahead of the P55/875K setup, especially when the 875K had HT disabled making it an even match for the 4 core 2500K.


      Fritz Chess Benchmark V. 4.3


      The P55/875K combo takes the lead here with HT enabled by a small margin, even surpassing the P67/2500K combo at 5GHz. This is mainly due to how this benchmark produces results, I believe CPU cores matter the most here, and that is something the 2500K doesn't have to offer when comparing the 875K with HT.


      Geekbench V. 2.1.12 x86


      Here is another benchmark where CPU cores matter a lot more than anything else. The P67 is ahead while HT is disabled on the P55, but once HT is enabled the P67 falls behind. At 5Ghz the P67 is able to easily beat out the 875K's 8 core score.


      Super PI Mod XS 1.5V

      1MB


      P67 and 2500K take a shining lead here, beating out the P55/875K combo even with HT enabled.


      32MB


      The P67 combo takes the lead here as well, and by a huge margin at 5GHz. And again, that 5Ghz is possible on these systems using air or water cooling, so there is no comparison here making it is easy to see which setup is the better performer.


      wPrime V. 1.55 32M


      Very close race here, with the P67 beating out the P55 by only a few ms with HT disabled on the 875K. With HT enabled for 8 cores, the 875K keeps up with the 2500K even at 5GHz.


      AIDA64 v1.50.1236 Bandwidth


      It's easy to see from these results which system offers the best memory performance, the P67A-UD7 is clearly ahead of the P55A-UD6 by a large margin. Hyper-threading was enabled on the P55/875K system for this test.
      Last edited by Lsdmeasap; 03-09-2011, 03:54 AM.

      Comment


      • #4
        Re: GIGABYTE GA-P67A-UD7 Review Featuring 6Gb/s RAID/USB3 Testing

        USB 3.0 Vs. 2.0 Benchmarking (STT 16GB USB3 stick Used)


        CrystalDiskMark V. 3.0.0f


        USB 3.0 read speeds are almost twice as fast as USB 2.0, write speeds are not as impressive. This is using a cheap USB 3.0 drive, just to show what is possible with a USB 3.0 device. There are much faster USB 3.0 drives, some offering speeds that can compete with today's faster Solid state drives.

        ATTO V. 2.34


        Again the USB 3.0 drive jumps ahead in reads by almost 20MB/s, writes are only 2-3MB/s faster when using USB 3.0.


        SSD Benchmarking


        IOP/s Results (Not included in graphs)


        ATTO V. 2.34

        Maximum Sequential


        6Gb/s SSD speed scaling with these boards is nothing short of amazing, topping out at almost 900MB/s read speeds. Two drives in RAID 0 at 6Gb/s produces speeds that are even, or higher than those of a single drive. When adding a third SSD via 3Gb/s the increase is not as large by any means, but it does still add to the overall benchmarks speeds.


        Maximum 4K


        Amazing 4K results here, reaching just over 845MB/s read speeds and 445MB/s writes!


        AS SSD Benchmark V. 1.5.3784.37609

        Total Score


        Amazing scores here, even for a single SSD. Scaling with two drives doubles compared to a what single drive offers, adding a third in at 3Gb/s isn't ideal but it is possible and still offers a large improvement.

        The Intel 6GB/s is clearly what we've all been waiting for, now they just need to offer us more than two ports to connect 6Gb/s drives.


        Max Sequential Read / Write


        Write scores topping off at 425MB/s and reads speeds of above 800MB/s is simply amazing!


        Max Sequential 4K Read / Write


        4K writes don't scale as well as most other areas, but the 4K reads here are great and more than double in RAID with two drives.


        Max Sequential 4K-64Thread read / Write


        64-Threaded 4K speeds with the P67 chipset are very impressive, RAID 0 with two drives nearly doubles the speeds of a single, and a third drive at 3Gb/s added to the mix gives another large increase in speeds too.


        PCMark Vantage Professional x64 V. 1.0.2.0


        Total Score


        When comparing a single drive at 6Gb/s to two SSD's in RAID 0 at 6Gb/s the score practically doubles. However, when adding a third drive via 3Gb/s to the RAID 0 array speeds do not increase as expected. This is a "Real World" test, mimicking many basic tasks that users would actually do with their systems, and it appears that adding that third drive in at 3Gb/s slows actual performance down rather than increasing speeds as other benchmarks may lead you to believe.

        So, all scores above aside, it is obvious that using RAID in this type of combination may not be the best way to utilize your SSD's unless you are only after benchmarking scores in other areas.


        HDD Test Suite 1-4


        As mentioned above, here you can easily see that the 2 x SSD at 6Gb/s is the ideal configuration.


        HDD Test Suite 5-8


        I noticed this in my previous review of the Crucial C300 SSD's, the test 6 results get out of line and produce massive results when using RAID for some reason. I am not sure what causes this, but it is easily reproducible at any time, so that is why you see the manually added results. As for why the 2 and 3 drive results are exactly the same, I am not sure, I tested three times to be sure there wasn't any funny business happening. So this is either as high as the benchmark result goes, or that is where they both come out at evenly? Again, I did test several times to be sure.

        In these results you can again see that when using C300 SSD's a RAID 0 with two drives at 6Gb/s offers the best performance.


        Temps With LinX 0.6.4 (Updated Linpack)


        P67A-UD7 + 2500K Combo - Vcore set 1.225V BIOS, 1.224V idle and 1.212V load.


        P55A-UD6 + 875K Combo - Vcore set 1.420V BIOS, 1.418V idle, and 1.392V load.


        I never realized until this test just how hot the 875K operates, it's a hot one for sure at the voltages required to run these speeds. So I apologize if these results look skewed in favor of the P67/2500K, that was not my intention at all.

        When idle at 4.2Ghz range, the P67/2500K combo ran at a very cool 29.25C, only ramping up to 57C under heavy LinX w/ AVX load. The P55/875K combo was only slightly warmer when idle despite the larger amount of voltage used, but once a load was applied it became very hot, very quickly, and topped out at 87C under LinX load. I did re-seat the CPU water block a few times on the P55 setup to ensure that the mounting was not causing these results, it was not and these temperatures are accurate.


        Final Thoughts:

        We all heard that there will be no overclocking before this chipset was released, however, the options are there but are very limited. You are only able to overclock via the CPU multiplier, or in very small increments via the FSB which is where the real limit lies. There are some CPU's that can overclock the FSB more than others, and some that cannot overclock the FSB at all, but most can go from 100 to 105-108 or so, give or take. CPU multiplier overclocking is unlocked on the K model CPU's, some being able to reach x55-x59, but the majority of CPU's out there cannot reach above x50-x52.

        The ES CPU used for most of this review was only able to reach a x51 CPU multiplier, however, the retail CPU I later used for the temperature part of this review was able to reach x53 CPU multiplier on air/water and x54 on phase cooling.

        I was able to obtain the HWBot 1st Place Cup for this board in the reference clock submissions at 108.44 FSB, this is the highest FSB achieved and submitted to HWBot with a GA-P67A-UD7 motherboard.


        GA-P67A-UD7 Reference Clock Global Ranking (Hall of Fame)
        GA-P67A-UD7 Reference Clock Global Ranking

        My GA-P67A-UD7 Reference Clock Submission
        Lsdmeasap's 108.44MHz Reference Clock Submission

        Gigabyte was quick to announce they had stopped motherboard production, and that their recall plans would soon be ironed out.

        In the meantime they released a Q&A for customers further explaining the issue describing how the boards were affected:
        Intel 6 series chipset issues - Q&A - GIGABYTE News Center

        GIGABYTE P67A B2 swap request:
        GIGABYTE Intel 6 series RMA program - GIGABYTE.com


        On Feb 25th, 2011 GIGABYTE announced that they have redesigned their P67 motherboard lineup so that customers can easily distinguish between the B2 and B3 boards. Also mentioning that they have already started production on the new B3 boards, and that shipping of the P67A lineup would now resume with all new boards under the -B3 moniker.
        GIGABYTE Ships All New B3 6 Series Motherboards - GIGABYTE News Center


        The new B3 motherboards are the same as the old B2 boards, with only a changed chipset, and in some instances a different audio codec. If you have a B2 board, you may start the replacement process with your place of purchase, or with GIGABYTE directly in the above linked news post. You may also continue to use your B2 board if you wish, however, if you do, it is suggested to use only the Marvell 9128 ports, or the Intel 6Gb/s ports.

        GIGABYTE Strongly urges users to get their boards replaced, so that you are not affected by this issue in the future.


        PRO's:
        1. Awesome new Matte Black PCB color, with no ugly browns bleeding through like other black PCB based boards
        2. NF200 chip for 3 way Crossfire or SLI (x16/x16/x8), or 4 way Crossfire at x8/x8/x8/x8
        3. 6 x SATA 6Gb/s ports (2 x Intel, 4 x Marvell {2 x SATA & 2 x eSATA)
        4. Onboard Power, Reset, and Clear CMOS switches (A must for benchers)
        5. 10 x USB 3.0 ports

        CON's:
        1. The BIOS does have some room for improvement (This is true with any newly released product, and I am sure all current quirks will be ironed out in future BIOS updates)

        GIGABYTE has a clear winner here, with the Intel chipset issue aside, I see no flaws at all on this board!


        I would like to give a HUGE Thank You to everyone at
        GIGABYTE, Crucial, and Mushkin for making this review possible!
        Last edited by Lsdmeasap; 03-09-2011, 03:56 AM.

        Comment

        Working...
        X